Why do you need an extra partition on your Mac and how to create it

Today we’re going to talk about partitions. What is it anyway?

A partition is a specific area of a hard drive, which has a beginning and an ending point, and the space between those points equals the total amount of size the partition defines.

Sometimes people confuse a partition with a volume, but there is a big difference between the two.
A volume is a file system on a partition your Mac or PC can recognize. Common types of volumes include DVDs, hard drives, and partitions or sections of hard drives.

Practically any type of storage you use for your Mac (SSDs, hard drives, USB flash drives, etc.) can be divided into partitions. Each partition can use one of four formats compatible with OS X: HFS/HFS+ (simple and encrypted), ExFAT and FAT.

There are good reasons to split your device into multiple partitions. For example, you want to run multiple versions of OS X on your Mac; organize your data PC-style; manage your backups efficiently or run Windows on your Mac. Especially if you are a big fan of OS X and install all OS X beta-versions, it is strongly recommended by Apple to install all beta versions on a separate partitions, as they can truly ruin your Mac!

To partition a drive, we can use the Disk Utility – a built-in Mac program to manage your hard drives.

NB: Your data will be erased during the procedure, so be sure to back up the information first.

  • Step 1: Open the Disk Utility by searching for it via Spotlight or finding it in Applications > Utilities
  • Step 2: Select the storage device you want to partition from the left pane. The selected drive will appear in the right pane together with its details, such as location, the way it’s connected, and the partition map in use
  • Step 3: Select the drive and then click the Partition button in the Disk Utility’s Toolbar. You will see a drop-down panel displaying a pie chart of how the drive is currently divided
  • Step 4: To add a partition, click the plus (+) button right below the pie chart
  • Step 5: Enter a name for the volume in the Partition field to be displayed on your Mac’s desktop. Press Apply

You can also adjust the volume size by either entering its value in the text box, or by shifting a pie slice anchor in the required direction.

However, some errors might occur in the process, causing you to end up with an unallocated space on your disk unseen in the Disk Utility. An unallocated space is like a void on your hard drive you can’t detect and use with Mac’s inbuilt apps. The only way to manage such space is to use the Terminal, but it is rather complicated and may lead to corruption of files and partitions.

For such cases we have a card up our sleeve: The new Paragon Hard Disk Manager for Mac Preview helps you to easily manage this unallocated space and use it to create partitions, add the unallocated space to the existing partitions, resize free space between Mac OS and Bootcamp partitions and much more.

With HDM for Mac Preview you can resize your partitions in 3 clicks.

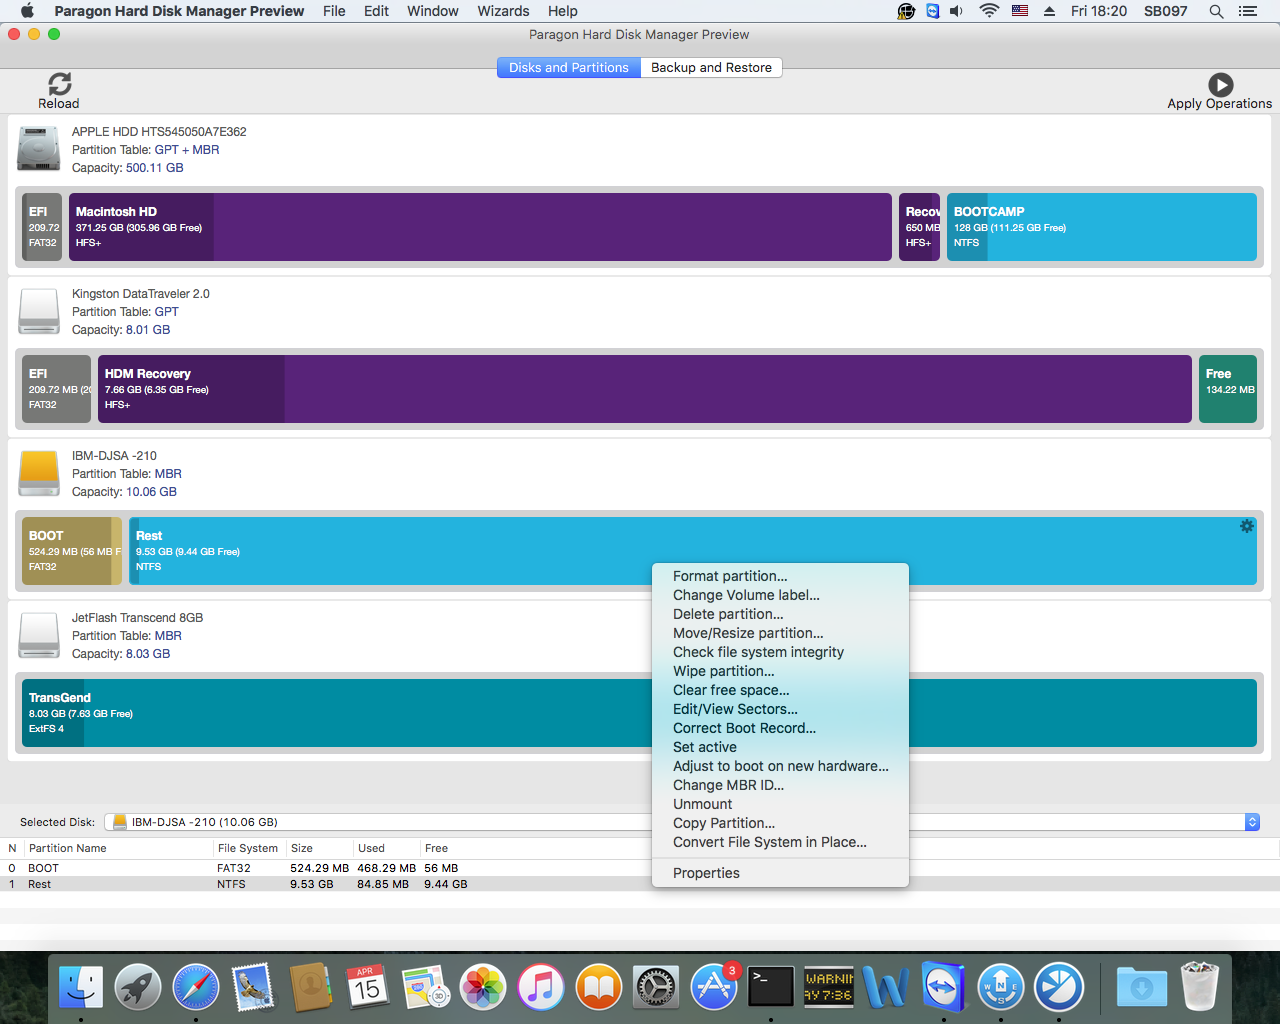
Click 1: Select the storage device you want to partition. Choose Move/Resize partition

HDM for mac Preview

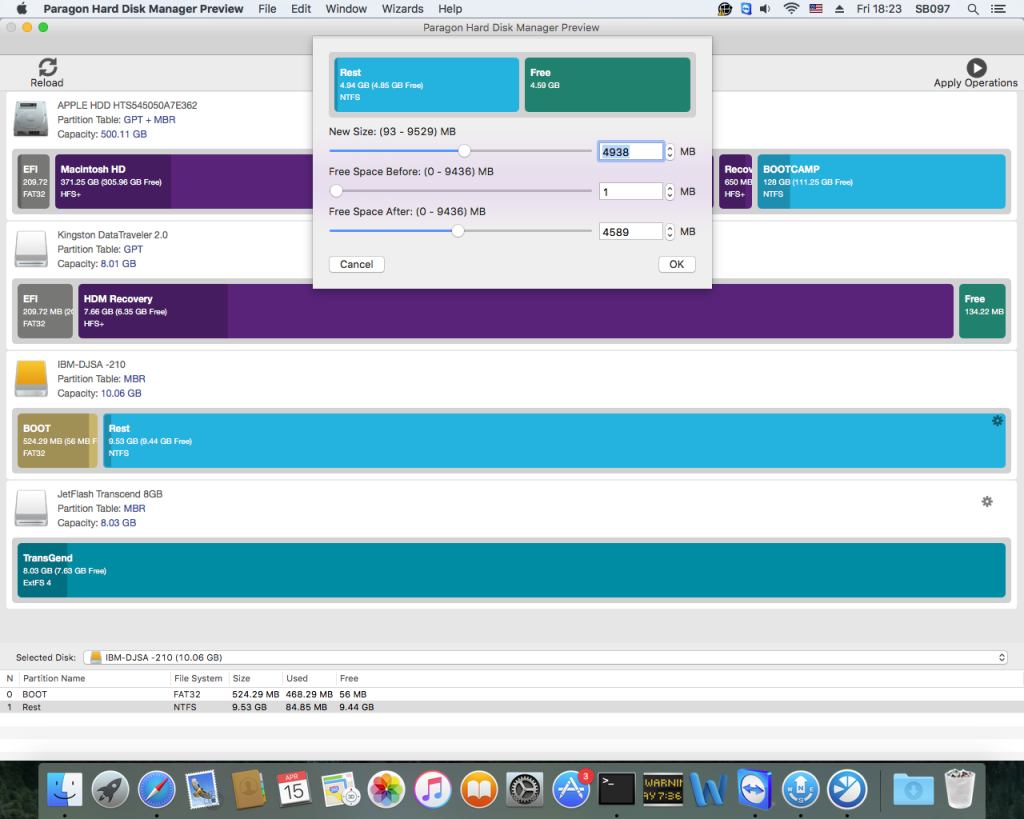
Click 2: Shift the anchor to select the size you need. Press OK

Resize partition

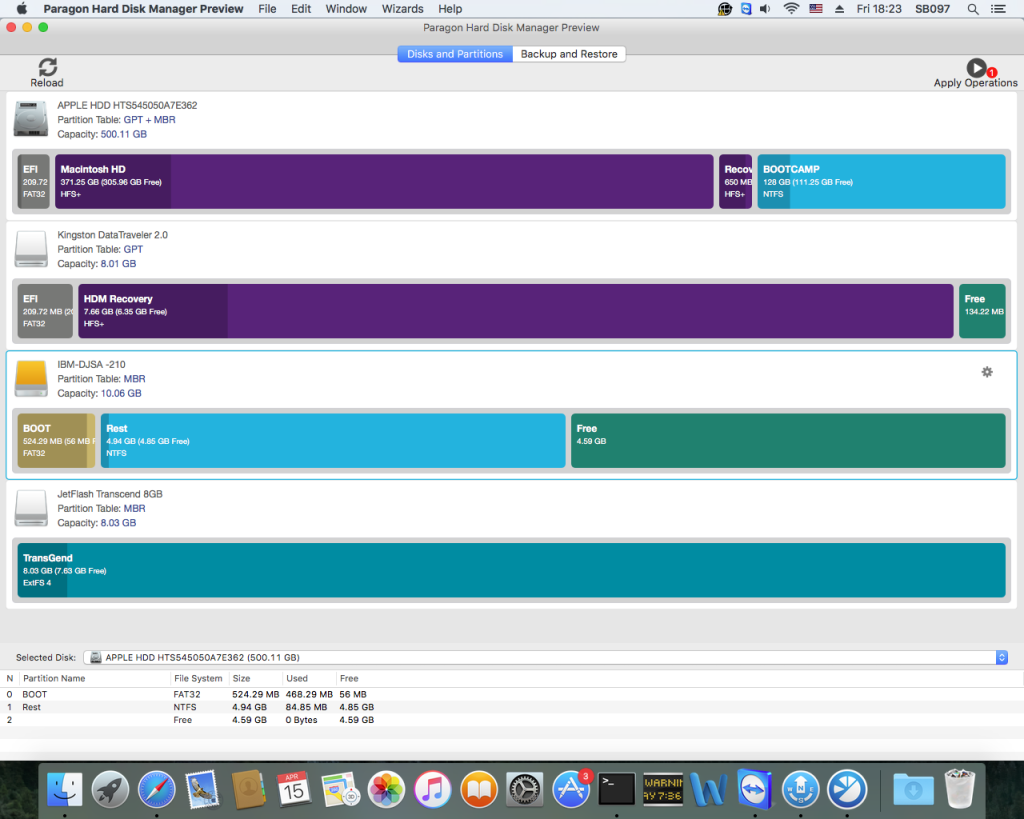
Click 3: Press Apply Operations at the top right of the menu

Press Apply

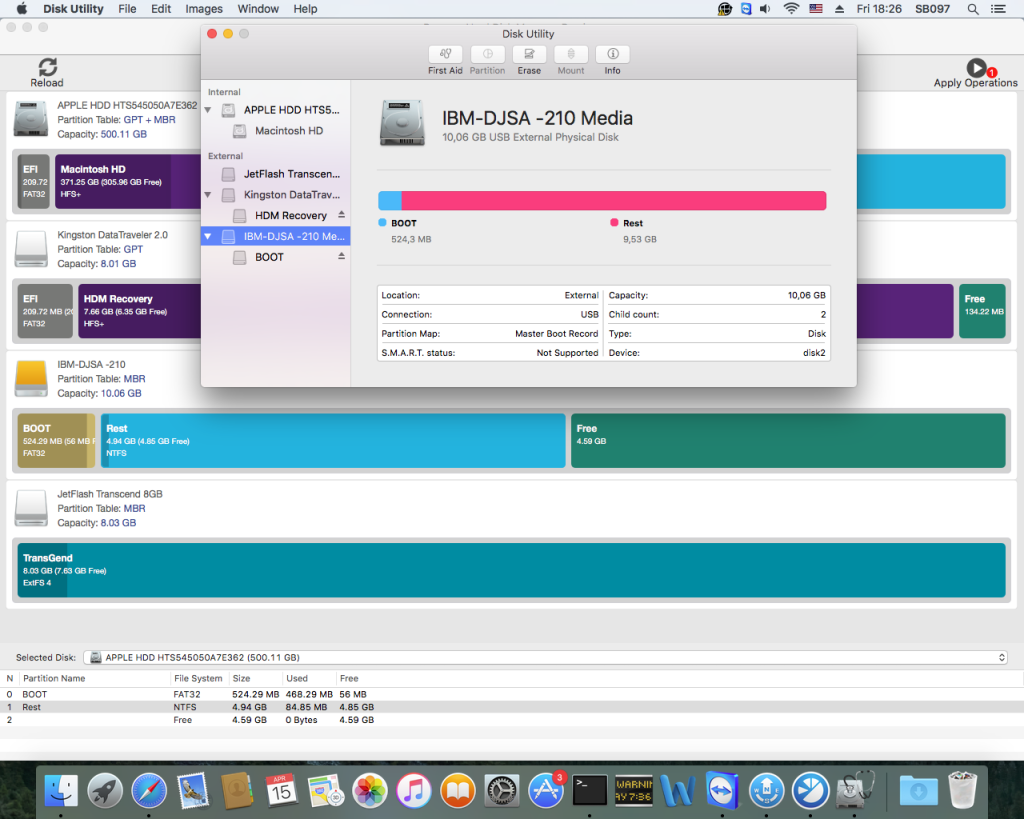
As you can see from the screenshot below, Disk Utility won’t show full information about an unallocated space on your storage device:

Unnalocated space

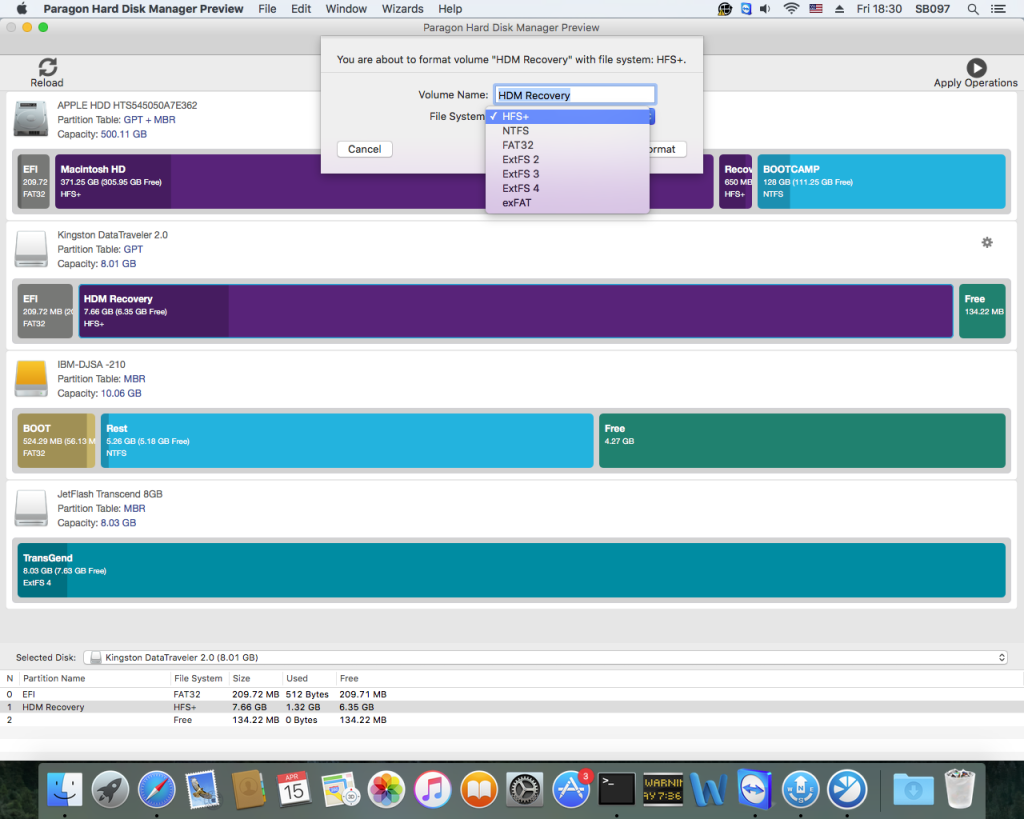
With HDM for Mac Preview you can additionally format all partitions to HFS+, NTFS, FAT32, ExtFS 2,3,4, exFAT:

FAT32, NTFS, exFAT, HFS+

Find these tips useful? Start using your Mac as a pro right now!

Paragon Hard Disk Manager for Mac

  • System Integrity Protection in OS X 10.11
    El Capitan support;
  • Core Storage backup and restore;
  • Snapshot-driven backup;
Learn more about Paragon Hard Disk Manager for Mac

Paragon Hard Disk Manager for Mac

An extremely simple trick to keep your Mac or PC from unauthorized access

We frequently talk about recent security threats, including the new Trojan horse called “Locky” that encrypts your information forever, making it impossible to read.
Unfortunately, Locky is not the only virus that can cause problems for your operating system. There are many other types of viruses which can silently infiltrate a computer without you even noticing it. One of the most common and easiest ways of accessing your system is through an external flash or a hard drive.

There are a number of software solutions to help prevent such infection, as well as a radical and 100 percent secure hardware method. You can protect your USB ports from an unauthorized access for a short period of time simply by disabling the ports.

If you are using Windows…

All that you need is Notepad and an administrator-level account.

First, create a new document, then copy and paste the following text:

Windows Registry Editor Version 5.00
[HKEY_LOCAL_MACHINE\SYSTEM\CurrentControlSet\Services\USBSTOR]
”Start”=dword:00000004
[HKEY_LOCAL_MACHINE\SYSTEM\CurrentControlSet\Services\USBSTOR\Enum]
”Count”=dword:00000000
”NextInstance”=dword:00000000

Save the file in the desired location and name it usboff.reg. Be sure to save it with the .reg extension and not .txt, or this trick will not work.

Now repeat the process, changing only two parts: in the line ”Start”=dword:00000004 change the 4 to a 3 , and then save a new file named usbon.reg.

Done!

Now when you want to disable the USB port, simply open the usboff.reg file and confirm the change. This will block any external drive plugged into your PC from working. As you might have guessed, opening and confirming the usbon.reg file will do just the opposite, once again enabling the USB port.
Assuming you are the only one with administrator-level access to the computer in question, no one will be able to change these files except you.

Now for the Mac

This trick is slightly more complicated than on Windows.
OS X 10.11 El Capitan brought with it an additional level of security for your Mac: System Integrity Protection (SIP), which prevents system-related files from modification. Even if you have an administrator-level account, you won’t be able to make changes to these files.

Apple’s new protection policy may have good intentions, but it clearly doesn’t help with our mission to disable USB.

NB! If you are using a USB keyboard or mouse, please don’t attempt this trick! You won’t be able to use these input devices, requiring an alternate method such as Bluetooth.

You can disable SIP by booting into recovery mode. Restart your Mac and hold Command+R as it boots.

From the menu, select Utilities > Terminal. In the Terminal window, type csrutil disable, press Enter, then restart your Mac.

To reenable SIP, launch Terminal while in Recovery mode, but this time type csrutil enable, then press Enter and restart.

But there’s an easier way – download and install the new Paragon Hard Disk Manager for Mac®, which provides, on top of other useful functions, one-click SIP disable feature.

When your SIP is disabled, do the following: open Finder and select Go -> Go to Folder from the menu. Copy and paste the /System/Library/Extensions path into the field and look for two files located there:

IOUSBMassStorageClass.kext
IOFireWireSerialBusProtocolTransport.KEXT

Move these files to the Desktop or other location, but be sure to keep them somewhere safe — you’ll need them to enable your USB ports again!

These small tricks can help you protect your information from being stolen or damaged. If you are interested in more advanced and useful features to protect your Mac, try our new Paragon Hard Disk Manager for Mac, a powerful disk management utility for OS X, featuring:

Paragon Hard Disk Manager for Mac

  • System Integrity Protection in OS X 10.11 El Capitan support;
  • Core Storage backup and restore;
  • Snapshot-driven backup;
Learn more about Paragon Hard Disk Manager for Mac

Paragon Hard Disk Manager for Mac

World Backup Day

Have you already backed up your data and memories? Today is the best day to think of it!

We do not force you to use the “The World Backup Day Pledge

“I solemnly swear to backup my important documents and precious memories on March 31st.”

but we will give you a chance to make a really easy back up of your complete hard drive, single partitions or selected files and folders.
Backup & Recovery

So we offer 100! Free Licenses of Backup & Recovery 15 Home on our Facebook page. All you have to do is to leave a comment on this posting

Paragon NTFS for Mac Recognized as the Best of Data Management Solutions by IT Innovation 2016 at CeBIT

At CeBIT 2016 in Hanover Germany, after review of several thousands submissions, the Initiative Mittelstand awarded the utility application Paragon NTFS for Mac 14 with the Best of IT Innovation 2016 in the category “Data Management.” Impressed by the product’s capabilities, the judges bestowed this special recognition to the popular OS X utility.

Paragon NTFS for Mac 14 allows anyone to easily access and format Windows NTFS-formatted partitions, even those used to dual-boot Windows on a Mac, simplifying management of Windows-based volumes in OS X 10.11 El Capitan. Paragon NTFS for Mac allows users to check and repair the file system integrity of NTFS partitions via the app’s graphical interface, using its volume management functions, instead of using complicated command line tools, as is required by other utilities of this type.

OS X 10.11 El Capitan’s new System Integrity Protection (SIP) feature prevents the use of third-party disk utilities in OS X Disk Utility. Paragon NTFS for Mac overcomes this limitation, simplifying management of such volumes in El Capitan.

“While Mac OS X allows users to easily read from Windows NTFS formatted partitions, it doesn’t allow them to write files to such a drive without entering arcane commands into Terminal, or allow them to fix any problems that a volume’s file system might incur,” says Ivan Sidorin, Product manager at Paragon Software Group. “Paragon NTFS for Mac allows users to read, write, run diagnostics, and fix any issues with NTFS volumes directly from its graphical volume management interface, simplifying the use of NTFS formatted volumes on the Mac.”

Users can conveniently use Paragon NTFS for Mac to easily navigate the contents  of any NTFS drive, allowing them to read, edit, copy, or create files and folders on the drive. The app provides fast and transparent access to any NTFS partition while running OS X 10.11.

Learn more about NTFS for Mac^E918FFE67C3D2094CC814264FAEBA5115597560CA4936CAB72^pimgpsh_fullsize_distr

How to safeguard your virtual infrastructure – snapshot, backup or replica?

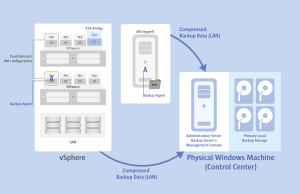
We get lots of questions about the necessity of backups with respect to virtual systems such as VMware virtual environments or ESXi hypervisors. The great number of existing technical terms on the topic and the equally great number of solution approaches make it hard to get an overview of it all. While snapshots and “classic” backups are related in nature, there are fundamental differences. And then there is also replication as a further member of the big family of data protection, backup, business continuity and high availability.

Whitepaper Download: Snapshot replica or backup - the right solution for ESXi
Whitepaper Download (PDF): Snapshot, Backup or Replica?

Hardware virtualization offers many advantages when it comes to making the most cost-effective use of expensive IT infrastructure. Furthermore, virtual systems are ideally suited for maintaining high availability of critical business applications and data. High availability and data backup are also closely related, but they are by no means identical twins.

Which is better? Backup or snapshot (or even replication)?

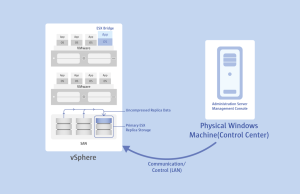
So when it comes to the question whether backup or snapshot is the better choice, the simple answer would be: “Neither of them!” It simply depends on the scenario at hand and the platforms being used, so it’s clear that the answer’s not so simple after all. Snapshots are ideal for making quick changes to the virtual machine. These changes can then either be used or discarded with just a few clicks. In the latter case, the snapshot is “played back” on the ESXi machine. Strictly put, a snapshot is thus neither suitable for high availability nor backup scenarios – its importance lies in the field of maintenance. In order to keep a virtual machine highly available, it’s a good idea to create VM replications. Why? Because the replica of a virtual machine corresponds to the original and can take over its task in just a few seconds. Replicas and snapshots are both temporary – so they are not suitable for retrieving lost datasets from the distant past.
In addition, they are usually saved on the same data storage as the original machine, which makes it impossible to restore them if they are physically damaged.
In our whitepaper Snapshot, Backup or Replica? What, When and How, we address the various techniques in greater detail, put them in context and show the differences.

Whitepaper Download: Snapshot replica or backup - the right solution for ESXi
Whitepaper Download (PDF): Snapshot, Backup or Replica?
Paragon Protect & Restore - the easy all-in-one availability solution for physical and virtual IT infrastructures
Paragon Protect & Restore

Paragon Protect & Restore is a cost-effective software solution which combines the comprehensive backup tools for virtual and physical servers and workstations in a central console. VMware, Hyper-V and physical servers can be backed up, restored and archived based on role. The free basic version provides a high-performance availability solution for small companies and start-ups – without straining their budgets!

Learn more about Paragon Protect & Restore »

Сircumventing the security challenges of OS X El Capitan

OS X El capitan may be more resistant than ever to malicious software, but its arrival means new challenges lie ahead for some third-party developers.

SIP: Forcing developers to think different

OS X El Capitan 10.11 offers serious defense against malware on a number of fronts, most notably System Integrity Protection (SIP for short). SIP removes administrative overrides for processes running in the background and disables root access to /usr, /bin, /sbin, and /System, preventing ANY user or application (with the exception of Mac-native installer software) from writing to those locations or modifying files residing there.
In doing so, Apple has for the first time rejected a key Unix principal by limiting the access privileges of a “superuser” (better known as root). Traditionally, users with administrator privileges could install software and generally access any part of the root-level system they so desire, while regular users had more limited access.
Although this approach has generally worked well since OS X debuted in 2001, there was always the potential threat of local or remote attacks from rogue Trojan horse software that gained access to root. By implementing SIP, veteran Mac power users now consider the operating system to be “rootless.”
It should be noted that Apple has provided power users with a workaround to temporarily disable SIP, simply by booting into the Recovery partition and selecting Utilities > Security Configuration from the menu. Next, uncheck Enforce System Integrity Protection, click Apply Configuration, and restart for the change to take effect. However, it’s clear that SIP is the way forward, so developers and end users will need to adapt accordingly.

Disk Utility vs. Third-Party Drivers

The El Capitan version of Disk Utility has also been through major changes — both cosmetically and under the hood. Once you get used to the glossy new user interface, veteran users might notice Apple has entirely removed the option to repair disk permissions. That’s because Apple no longer allows permissions to change in any way, with the exception of an automatic repair run during software updates.

But that’s not all: Disk Utility no longer manages disks mounted by third-party drivers, at least not through the program’s graphical user interface. The reasons for the change don’t make a whole lot of sense to outsiders, especially when disks mounted by non-native drivers can still be mounted, formatted, or repaired by using the command-line diskutil.

Making OS X more like mobile

An additional security improvement removes the possibility of using unsigned kernel extensions (kexts) which modify the core of OS X. Starting with El Capitan, developers must sign kexts with a valid Apple certificate in order for them to continue working. This means perfectly good drivers for discontinued products or expensive hardware could suddenly become unusable after upgrading to the new OS — with no easy or reliable downgrade available!

By adopting such changes, Apple aims to make OS X a more user-friendly and secure platform similar to iOS, which powers the company’s popular iPhone, iPad, and iPod touch products. Although this move will surely benefit average users and protect them from the ever-increasing threat of malicious software, the additional layers of security temporarily complicate matters for advanced power users and Mac developers whose livelihood depends upon OS X.

The challenge for developers

If you already purchase most of your software from the Mac App Store, chances are you’ll never notice (or care) about the under-the-hood changes Apple has implemented with OS X El Capitan. But there are plenty of third-party developers who will be affected, especially those who offer software outside of Apple’s walled garden ecosystem.

The makers of popular utility software like Default Folder X have already discovered solutions to work around El Capitan’s new challenges, which required a complete overhaul of the existing application in order to implement. Paragon Software faced a similar challenge with NTFS for Mac, which adds the ability to write to Windows-formatted volumes, which can’t natively be done with OS X alone.

Like many other developers, Paragon products have traditionally stored application components in the very places El Capitan no longer permits. For example, the NTFS for Mac driver would be installed in /System/Library/Filesystems, while auxiliary command-line utilities were located in /usr/sbin.

Because of SIP, NTFS for Mac 14 and higher now place this driver in /Library/Filesystems, relocating associated utilities to /usr/local/sbin/, where root still has full privileges. It’s not only a reasonable alternative, but also remains proper Unix etiquette. Likewise, the NTFS for Mac 14 driver is properly signed as a kernel extension, making it a required update for owners of earlier versions prior to upgrading to El Capitan.

Meet the new NTFS for Mac 14

In addition to the under the hood changes outlined above, the familiar NTFS for Mac preferences pane has been overhauled with version 14. Since Disk Utility can no longer be used to work with Windows-formatted volumes, NTFS for Mac 14 now includes built-in format, verify, and mount functionality.

In addition to Windows NTFS, other file systems supported by OS X can also be used with this preference pane — for example, if Paragon’s ExtFS for Mac driver is already installed on the same system, NTFS for Mac will also be able to format, verify, or mount Linux-native Ext2/3/4 disks as well.

Here’s what NTFS for Mac 14 looks like when launched:

123

And here’s a look at the new way to format volumes as NTFS:

456

NTFS for Mac 14 can also be used to verify a volume for possible file system errors:

789

For those comfortable with Terminal, the same actions can also be performed with Paragon’s command-line utilities. Advanced users familiar with Unix will have access to additional options through this interface:

  • fsck_ufsd_NTFS finds and repairs errors on NTFS disks.

901

  • fsck_ufsd_NTFS formats a volume to NTFS.

902

  • mount_ufsd_NTFS mounts or unmounts NTFS disks.

Finally, support of the Windows NT file system is automatically added to the command-line diskutil during installation of the NTFS for Mac driver.

Download and try NTFS for Mac 14 for free!

5 reasons to use Paragon USB plugin to increase Android’s performance

#1 – Extra storage space instead of buying a new smartphone

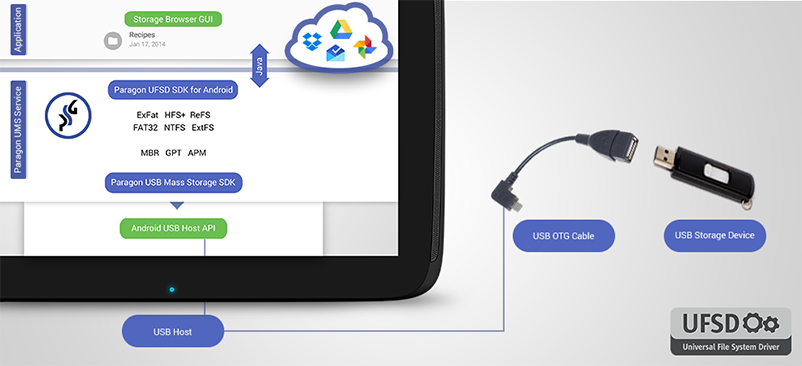
The more storage space a mobile device has, the more expensive it costs. With Paragon’s USB plugin, you won’t need to spend more on storage space. Instead, just use an inexpensive portable storage device connected to your Android device using the USB OTG cable — the same way you already do it with your desktop computer or laptop. There’s no longer a need to replace your Android device when all you need is more storage space.

There are two simple ways to get extra storage space using Paragon Software:

  • SD card: Add an extra 32-128 GB for less than $25
  • USB Mass Storage Device: Use it for backup or to save multimedia no matter where you are

#2 – Connect with everything

Your boss or client uses an iPhone, but it’s too hard to transfer a presentation from your Android device. Paragon’s USB plugin supports multiple partitioning schemes and file systems, including NTFS, HFS+, and FAT32.

#3 – To be online or not to be? It’s no longer a question

You do not need to stay online all the time to work with data. Cloud storage is not yet the best way to share or work with multimedia and other common data. Even if you were in Antarctica, you can make data transfers between any device without mobile internet or Wi-Fi by using any SD card or USB Mass Storage Device you prefer.

#4 – Save & Share 4K videos and other high-resolution media

2016 will see an explosion of 4K and 8K video content, creating new storage demands for the video creation industry and tech-savvy consumers. Filming in 4K takes up about seven times more data than 1080p, so what’s the best solution for storing all of this data? You can simply use portable storage devices as a data bank, connected to your Android device using a USB OTG cable and Paragon’s USB plugin.

#5 – NTFS Support on Android without Root

Android does not yet natively support NTFS read/write capabilities (read more above). Most SD cards/pen drives arrive formatted as FAT32. Average users who prefer not to root their Android smartphones can now add NTFS support to Android from the Total Commander app and USB plugin developed by Paragon. Enjoy non-root communications!

Download and install Total Commander for Android, install Paragon USB plugin, connect NTFS, FAT32 or HFS+ formatted disks or other storage devices via USB OTG and enjoy instant, high-speed access.

en_generic_rgb_wo

Most effective protection against the Locky Trojan horse – an up-to-date backup

Locky – a new Trojan horse that encrypts your files

It’s time to take caution because a new Trojan horse known as “Locky” is striking terror everywhere and is spreading like wildfire all over the internet. More and more infections have been reported in the past few days, especially in Germany – thousands of infections an hour, in fact! Like many other harmful programs, this Trojan horse also spreads via E-mail. Specifically, E-mails with infected Office documents attached are being sent to unsuspecting victims. These document contain a macro code which the Trojan horse installs as soon as the document is opened. The insidious trick here is that such documents are often passed off under the guise of an open invoice. The virus is now being spread by JScripts as well.
Once installed, the virus searches for certain file types which the developers of the virus assume to be private files of personal value, such as text documents and multi-media files. Files in accessible networks and cloud storages can also fall victim to the virus. These files are then encrypted by Locky so that the user can no longer open them. Instead, the user is demanded to pay the developers ransom money to decrypt the files. Unfortunately, there is no way at present to remove the virus from the system once it has been activated. As soon as you detect that Locky has infected your system, you should shut your system down as quickly as possible – even the rough way by pulling the plug on your computer. This way, you can at least prevent the Trojan horse from causing even more damage. You can then remove the virus with a disinfection CD and attempt to restore the encrypted files. However, this approach only works for files which Windows has made a “shadow copy” of. Unfortunately, Locky will also delete these files, which severely limits your chances of success.
That’s why it’s better to take preventative action so that you won’t even catch the virus in the first place. This means there are basic rules for protecting your system from external attacks (which you should already be following anyway).
Do not open file attachments on E-mails from senders you don’t know, and back up important files on a separate data medium. Make sure to keep your antivirus program up to date at all times. You should also update your operating system and other programs regularly, since these updates often close security loopholes which Trojan horses take advantage of.
Specifically for this virus, you can configure your MS Office not to run any macro code at all, or only to do so upon confirmation from you.
If you have already fallen victim to Locky, make sure to keep the encrypted files. Since the virus is quite new, there is no way to reverse the damage right now, but this may change over time. This makes it all the more important look for updates on a regular basis.

How can you protect yourself?

The only effective protection in a worst-case scenario is to have a backup on hand which can reliably restore your data. This is also recommended by the BSI (German Federal Office for Information Security).

Paragon Backup & Recovery

Backup & Recovery 15 Home
Backup & Recovery Home

That’s why we recommend our solution Backup & Recovery 14 Free Edition for personal backups.
You can get it for private use free-of-charge at www.paragon-software.com/home/br-free/.
The expanded for-pay version of Backup & Recovery 15 Home can be had at a reduced price of just $19.95 (until March 15, 2016) as a single license, or as a family license (3 PCs in one household) for just $ 34.95.

Don’t wait: today is the best day for a backup!

Paragon Camptune X can now add up 2 GBs to your BootCamp partition

The updated version comes with a redesigned user interface, and allows owners of the free edition to also work with Boot Camp.

New and improved features:

  • 2GB can now be reallocated between OS X and Windows absolutely free, particularly convenient for urgent, last-minute changes to available disk space.
  • The new interface design is more intuitive and user-friendly.

Ivan Sidorin, product manager: “We have improved the overall impression of working with the Camptune X application, which has been redesigned to be more convenient from the user’s perspective. We pay close attention to how the user interacts with the software. The new version also improves overall reliability. Finally, we’ve made it more convenient for users of the free edition — for example, if you’re running out of disk space on the Windows partition and urgently need to preserve system updates or other files under 2GB in size. With Paragon Camptune X 10.10, you can now do it in just one click without having to purchase the full version.”

The apps supports OS X 10.6 Snow Leopard to OS X 10.11 El Capitan.

Download yourself and try now!

Get it from CNET Download.com!

UFSD SDK makes it easier for system management, security software vendors and motherboard manufacturers to expand capabilities in UEFI environments

The new SDK expands the possibilities for system management and security software vendors working in UEFI environments. The technology allows system vendors and motherboard manufacturers to make their UEFI systems more competitive and user-friendly.

Introduced by Intel in 2005 as a replacement for the aging MBR (Master Boot Record) and PC BIOS (Basic Input/Output System) interfaces, UEFI now comes standard on new computers, where it is positioned between the operating system and firmware stacks. Despite advantages over traditional BIOS and MBR, UEFI is technically limited by its support for FAT32 (File Allocation Table), an outdated file system, which restricts file sizes to less than four gigabytes. In an effort to address this problem, motherboard manufacturers have started to implement read-only NTFS support into their UEFI firmware — but this only solves half of the problem.

With the release of UFSD SDK for UEFI, Paragon Software now delivers a complete read/write solution. Based upon the company’s industry-proven, cross-platform Universal File System Driver library used around the world in billions of devices such as smartphones, tablets, routers, networked storage, and cameras, the new SDK opens transparent, full read/write support for Windows-native NTFS, Linux-native ExtFS, and other file systems in the UEFI pre-boot environment.

Key Features

  • Full access to NTFS, ExtFS, ExFAT, HFS+, ReFS in the UEFI pre-boot environment

Example Scenarios

  • Use NTFS- or ExtFS-formatted thumb drives to install operating systems
  • Check the integrity of core OS files in the pre-boot environment and restore modified files
  • Scan for and remove malware (including “rootkits”) before they gain control over the running OS
  • Deploy system updates in the pre-boot environment without interfering OS applications
  • Restore NTFS or ExtFS volumes from backup images

How it Works

Watch the video demonstration

Availability:

The UFSD SDK is available for licensing