When it comes to announcing new software, Apple gets into an annual cycle. We saw the reveal of macOS Sierra at the Worldwide Developers Conference in June 2016, with a private beta issued to developers at the same time. A public beta, released on July 7, brought Siri, the picture-in-picture mode and a bunch of new Continuity features, like an Auto Unlock option for unlocking a Mac with an Apple Wtch and a Universal Clipboard for copying and pasting text from one Apple device to another.
One of the most exciting announcements was Apple’s new file system APFS, which is already available to Apple developers in a pre-release macOS Sierra beta version and is scheduled to ship in 2017. It’s optimized for Flash/SSD storage and features strong encryption, copy-on-write metadata, space sharing, cloning of files and directories, snapshots, fast directory sizing, atomic safe-save primitives and improved file system fundamentals.
On August 29th, Apple released the eighth beta of macOS Sierra to developers and the seventh beta version to public testers. Though most of macOS Sierra’s features were revealed at WWDC, there are still a handful of discoveries to look for.
If you have an iPhone or iPad and don’t want to wait for more than a week to try out the new Continuity features, like Universal Clipboard and others, you need to install the iOS 10 beta.
However, the software is still in beta stage meaning there could be bugs and interface issues. Make sure to back up your data before installing the beta. If you end up having a serious problem, you can revert back using your backup.
So, if you decided to install macOS Sierra beta, follow these steps:
1. Get the Installer here https://beta.apple.com/sp/betaprogram/. You’ll have to sign in using your Apple ID. Once you’ve signed in, the macOS Sierra beta will be downloaded to your machine.
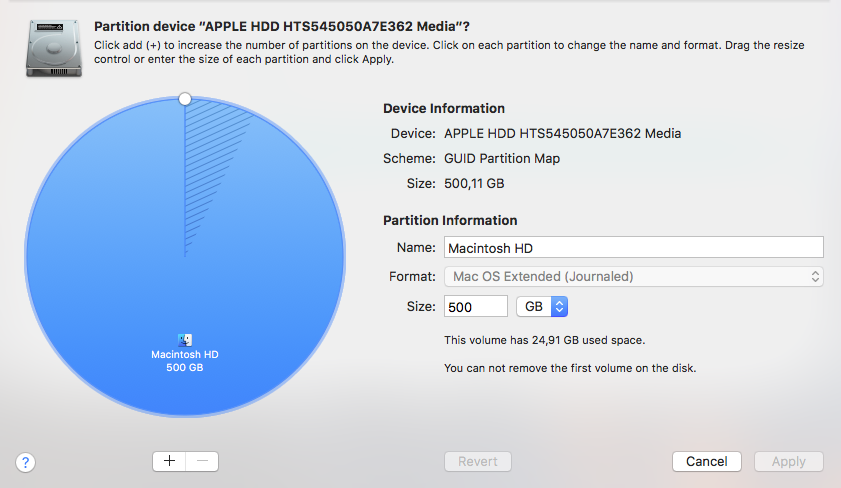
2. It’s a good idea to install the beta to a partition rather than over your main operating system. Open Disk Utility, click the “Partition” button, then click on the [+] plus button to create a new partition. You’ll need minimum 20GB for basic testing. Click “Apply” to create the new partition on the drive.

3. Run the Installer from the /Applications/ folder on the Mac.
Go through the installation process, and when you get to the disk selection screen, choose “Show All Disks” and select the one you’ve created, click on “Install” to begin installing macOS Sierra to that partition.You will be asked, once again, to make sure you have backed up your data. If you have already created a back up with Paragon Hard Disk Manager for Mac and good to go, then just click “Continue” to proceed.
4. Restart your Mac after the installation is complete and set up your new Installation.


How to switch between macOS Sierra 10.12 and OS X El Capitan
Now you can easily switch between macOS Sierra and the earlier Mac OS X system:
1. Reboot the Mac from the Apple menu, as usual;
2. Hold down the “Option” key, when you hear the boot chime sound;
2. Select the drive and the operating system you want to boot from, then macOS Sierra or OS X El Capitan.
It’s that easy, you can reboot and switch between the operating systems running on the same Mac in no time!
Backup your Mac – efficiently and reliably!
Snapshot is the best technology to back up your data. The announced Apple File System (APFS) brings this long-anticipated file system mechanism. The arrival of the snapshot functionality in APFS promises big changes to Time Machine, which should completely replace the creaky, aging mechanism of hard links – a slow and resource-consuming process.
Paragon Hard Disk Manager for Mac delivers everything for data management, backup and recovery. It is designed to create instant copies of a disk (or several disks) at a specific point in time. This technology takes consistent snapshots of both inactive and in-use partitions. Unlike Time Machine, it provides snapshot-based backup and operates at the sector level, achieving superior performance and speed.
Paragon Hard Disk Manager for Mac is not just for backup — it’s a powerful application that covers all aspects of the computer’s life cycle, including drive partitioning, file system optimization and repair functions, irreversible data wiping. It also supports all OS X, Windows, and Linux file systems bridging incompatible systems. With Paragon Hard Disk Manager you can even back up data to affordable and popular NTFS-based carriers.
Enjoy the new macOS Sierra and its new features, and do not forget to back up your data and system with Paragon Hard Disk Manager for Mac!

You’ve got instructions on how to install Sierra yet your own NTFS driver software is not compatible with Sierra making my drives unusable. Please upgrade your drivers ASAP!
A file system driver such as Paragon NTFS for Mac is not expected to work after the Mac operating system has been upgraded to a new main version (e.g.El Capitan to Sierra). A version change of the operating system always requires Paragon NTFS for Mac to be uninstalled and reinstalled under the new system. Our drivers would update as soon as official Sierra is out.
Edit: everything is fixed with 14.3 update
Hi i cannot use my seagate backup plus unless i deactivate paragon for mac. I recently upgraded to sierra and now i cannot write in my external.
Is your update available ?, if not when will it be available.
thanks,
Hi! Please create a support ticket via MyParagon account, our support team will help you.