Important Tips on Protecting Your System and Data Against WannaCry and Ransomware Attacks

Past few days we all have been following the breaking news on the fast-spreading WannaCry ransomware affecting globally hundreds of thousands PC systems around the world, and are wondering what is this virus and whether your computer system and data might be at risk. WannaCry, like any ransomware is a computer virus that usually spreads via spam emails and malicious download links. The virus is designed to lock up computer files and the ultimate goal is to blackmail the affected user until the victim pays the ransom demand, usually $300-$500 in Bitcoins.

Wana_Decrypt0r_screenshot
Screenshot of the ransom note left on an infected system

WannaCry is especially malicious because it spreads itself and doesn’t even require the user to click any link or open a file. Now most of us wonder how to make your system and data secure.

Planning your data protection and recovery strategy is essential to any PC user. This awareness guide will help you be cautious and save your valuable data on PC from WannaCry or any other potential ransomware threat. In addition to installing anti-virus software like Kaspersky or similar solutions, every PC user should implement stringent backup controls with snapshots to increase safety from attacks and prevent possible data loss. Since this widely spread global cyber-attack is just one of many to hit users, reliable system and data backup is always the key to protect against such malware threats.

Countries_affected_in_WannaCry_ransomware_attack
Map of the countries initially affected by the virus

The following advisory on WannaCry ransomware will help prevent data loss and in case of a disaster recover it fast:

1. Backup your computer with the reliable backup solution.
2. Update your Windows OS with Microsoft’s latest fix.
3. B careful of opening any unknown emails, websites and apps.
4. Use anti-virus protection software in conjunction with a firewall.

To help users protect their systems and valuable data, this week Paragon Software Group started offering all new and existing customers of Paragon Hard Disk Manager 15 Suite and Paragon Hard Disk Manager 15 Professional – the all-inclusive data management tools with full Windows 10 Creators Update support, Br16-protect-restoreParagon Backup & Recovery 16 software absolutely free of charge. This essential tool can be used alongside Paragon Hard Disk Manager for stronger backup functionality, or separately on other devices.

Stay safe and always backup your system.

Basic Ransomware Prevention: How Data Backups Can Save Your System From Hackers

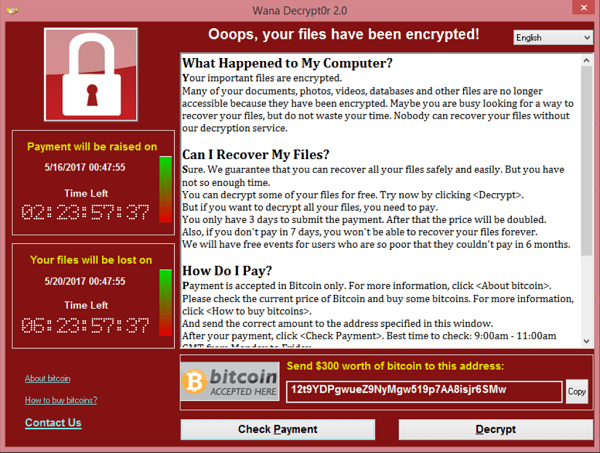
Over the past few years, millions of PCs from around the world have been locked or had their files encrypted as a result of devious malware.
According to Kaspersky Security Bulletin, in 2015 there were 1,966,324 registered notifications for attempted malware infections aiming to steal money via online access to bank accounts. Various ransomware programs were detected on 753,684 computers of unique users; more than 179,000 computers were targeted by encryption ransomware.

In April 2016, CNN Money reported new estimates from the FBI that revealed the costs from so-called ransomware have reached an all-time high. Cyber-criminals collected $209 million in the first three months of 2016 by extorting businesses and institutions to unlock computer servers.

Of course, those big numbers don’t usually affect us, regular users, but we still have our fair share of parasitic programs to be worried about.

One of the newest malwares looks like a pop-up message in Safari that signs: “Your Apple Computer has been blocked. Mac iOS alert! System might be infected due to unexpected error! Suspicious Activity Detected. Your Browser might be hijacked or hacked.” It gives you an 800 number to call and the person on the other end of the line offers you to share your screen and tries to sell you $200-cost security software.

Paragon Hard Disk Manager for Mac

That kind of ‘warning’ message is a common form of malware itself. The problem is that the pop-up appears every time you try to reopen Safari, and it’s impossible to dismiss the pop-up and then access Safari settings before the pop-up reappears. So how do you access Safari and make sure this doesn’t happen again?

Oddly, there’s no way to reset Safari’s settings from outside of the app. First, try the most standard ways to work around a malicious webpage in your browser.

– Launch Safari with the “shift” key held down. This should prevent Safari from opening the pages from the last session.

– Load Safari, then Control-click on its icon in the Dock and choose Force Quit. Try this a couple of times and Safari may get the message that there’s something wrong on startup and start without loading anything.

– Update to El Capitan or Sierra if you haven’t already. Apple added a lot more malware protection in the new OSes, including fixes that stop many browser-based hijack methods.

– Disconnect the computer from the Internet. If there’s no malware hosted locally, the pop-up can only be generated by loading a remote webpage that’s set as the home page. Open your Safari preferences and check, if your home page had been set to an unknown domain. Delete that URL from your Safari settings and turn the Wi-Fi connection back on.

However, the most efficient way to protect yourself is to back up your system to the state before malware hit your machine.

For example, the most recent hacker attack on the San Francisco transit system, in which hackers tried to extort about $73,000 from the transit service in exchange for giving back control of their computer system, ended up relatively well. That’s because Muni, which runs San Francisco’s bus, light rail and trolley car systems, had a backup of its system and, as a consequence, no customer data was stolen.

One of the most popular backup tools is Time Machine – the built-in utility for Mac, introduced with OS X Leopard. Time Machine works at the file level, which is inefficient when dealing with an active operating system and running applications. Files should be unlocked or closed for proper backup, which is not an option with most system files and those used by currently running apps.

Time Machine waits until user applications are closed and locked files become available to process, ignoring system files completely. That’s why OS X has a two-step restore procedure: The user first reinstalls the operating system before retrieving application and user files from the backup image.

There’s a better backup approach based on system snapshots, which considerably reduces backup and recovery times. Snapshot is like taking a photo of your file system, excluding changes made after that point. They will still be present on your hard drives and will be included with the future backups, but not the current one. That’s exactly why this is the only backup method that can be used to protect an active operating system. Additionally, although Time Machine waits until running applications are closed and locked files become available, the backup operation obviously takes more time than if it’s done with a snapshot-based utility.

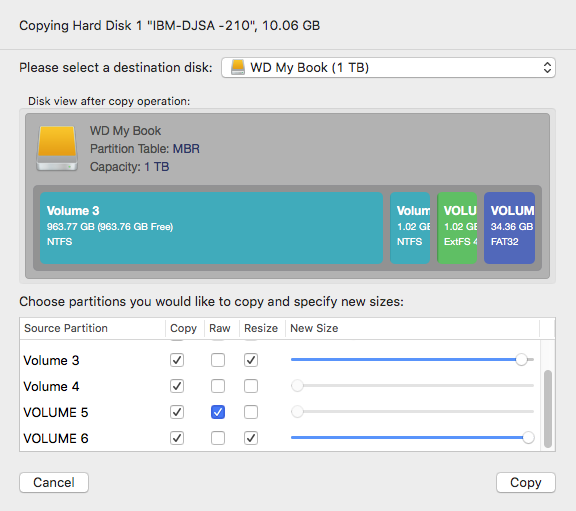
To illustrate the difference, we performed an internal lab test, comparing the brand new Paragon Hard Disk Manager for Mac against Time Machine and another popular file-level backup solution (test results and graphics are available upon request).

Paragon_Hard_Disk_Manager

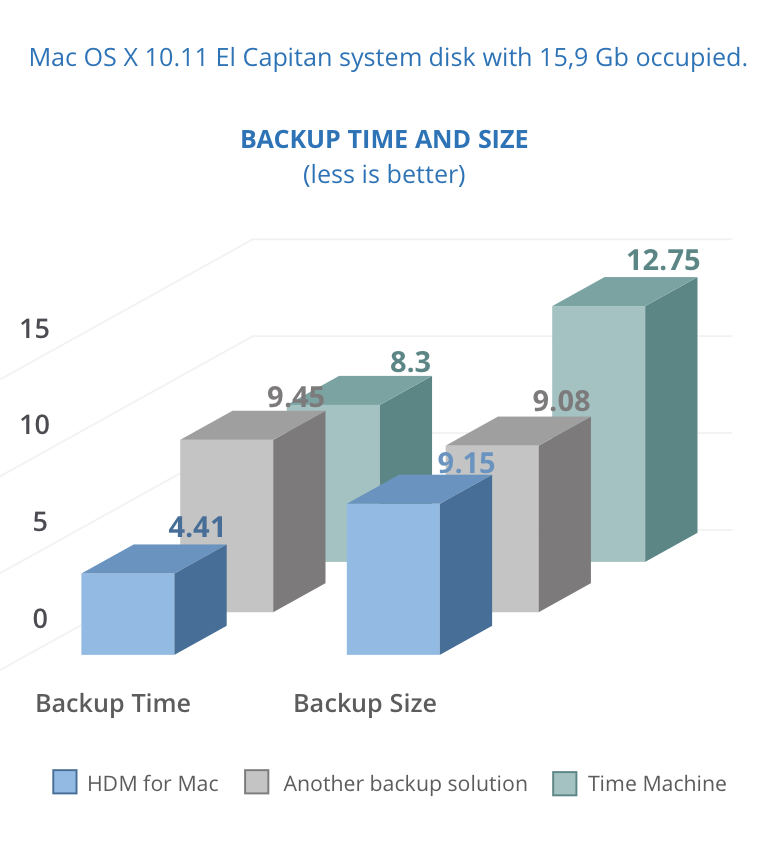
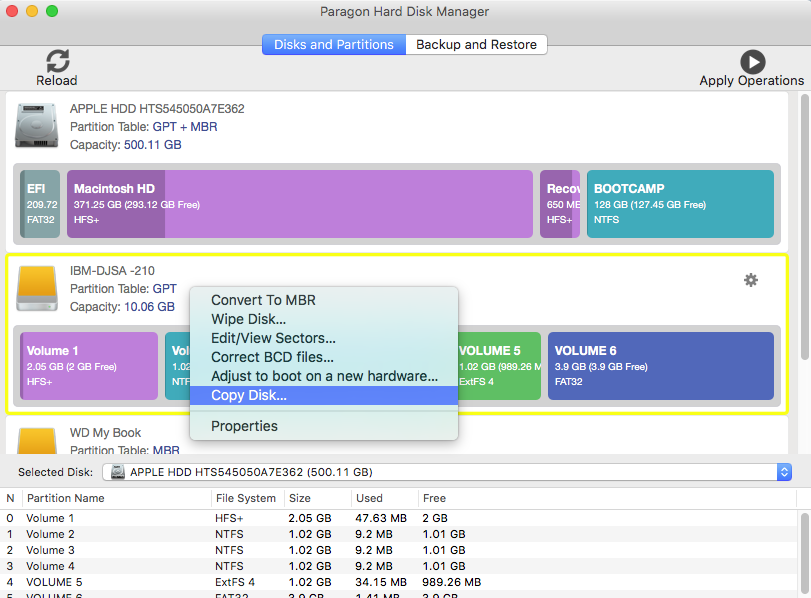
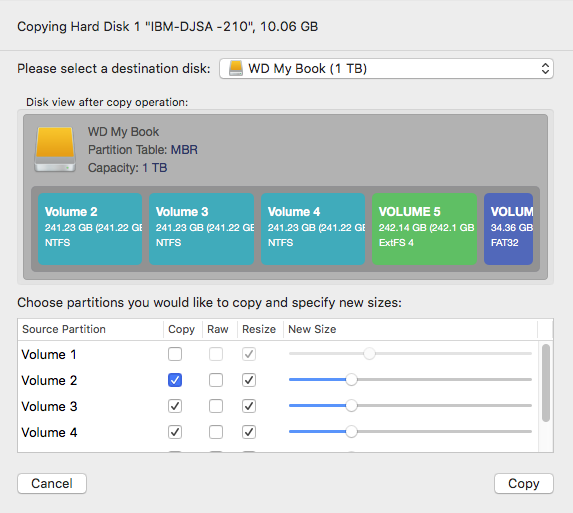
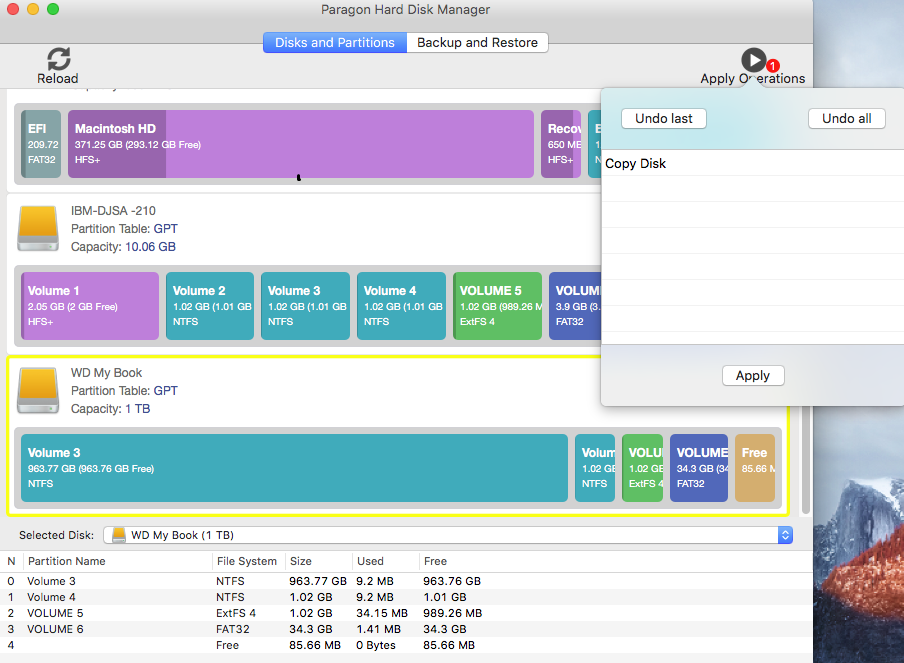
Paragon HDM for Mac is designed to create instant copies of a disk (or several disks) at a specific point in time. This technology takes consistent snapshots of both inactive and in-use partitions. Unlike Time Machine, HDM provides snapshot-based backup and operates at the sector level, achieving superior performance and speed.

As you can see from the graph above, it takes Hard Disk Manager far less time to back up 9.15 Gb of information than Time Machine or a similar solution. HDM for Mac comes with improved snapshot technology, enabling consistent image backups even as the data is being modified at that moment.

So, if you want your Mac to be malware-proof – always back it up! By backing up your system, you save valuable information and a lot of time should you need to restore.

Paragon Hard Disk Manager for Mac

  • System Integrity Protection in OS X 10.11
    El Capitan support;
  • Sector-level backup for best perfomance and backup/recovery speed;
  • Move, resize, undelete partitions and modify their properties;
    • Migrate Windows OS from one Mac computer to another;
      • Format volumes in any of the common file systems (NTFS, HFS+, ExtFS, FAT 16/FAT 32 and exFAT);
      • And much more!

Learn more about Paragon Hard Disk Manager for Mac

Santa’s Conundrum: Surface Book or MacBook Pro?

Christmas is just around the corner, and every year, the author of this article asks himself the question: “am I getting a new Mac?”

OK, to be honest, the author never got a Mac or PC as a present, be it for Christmas or any other occasion. Beyond that, he wouldn’t necessarily choose a machine like that at all if he still had three wishes left.

But first of all, since no fairy ever came along with three wishes to give (at least not yet), and secondly, that it’s been a few years since the author last believed in Santa Claus and thirdly, that he doesn’t know anybody else who could make such wishes come true, this question is largely irrelevant.

Be that as it may: The hard disk has been making some really strange sounds for a while and the excessively loud fan noise has been getting on the author’s tender nerves for a long time by now. The laptop already has nearly five years under its belt – maybe it really is the right time to start looking for a new one?

An iPad, perhaps, or maybe even one of these hip new Macbook Pros with a touch bar? Or one of the new Microsoft Surface Books or maybe even a Surface Studio all-in-one PC would be a real eye-catcher.

The agony oxmas16_235x425pxf choice, so the saying goes. In this case, it’s also hard to balance out the pros and the cons. In spite of its somewhat higher price, the author tends a bit towards Microsoft’s classy laptop, not least because of its integrated tablet function.

One way or another, something has to be done about clattering hard disk – and quickly. An extra backup can never hurt, and if you pick the right one, you might even be able to restore your hard-earned work environment on the new hardware. If the author chooses a new laptop, then he could use his entire system on the new machine without having to change it – including all of the applications. And since the author earns his daily bread at a software company – one that specializes in data migration, backup and restoration – he naturally took precautions, and with the Paragon Hard Disk Manager, he had the right tool at hand.

If the author decides to get a new Surface or Macbook later on, he won’t have any trouble getting started. With the Hard Disk Manager for Windows or Mac, he can optimize for one operating system or the other, move his existing systems to new hardware, back up his Mac OS as well as his Windows PC, and much more. Observant readers may have already noted that the author feels at home on the Mac as well as with Windows – if not, then it’s clear now.

Switching between the two systems has become second nature to him; so much so that he doesn’t always remember which machine he created which file on. But thanks to Paragon NTFS for Mac drivers, this doesn’t matter much anymore. He can access his files from either world with the greatest of ease.

If this gets anybody to thinking: “It’s so easy to juggle between Mac and Windows? I wish I could do that!” then the Paragon Christmas bundle would be the thing to get. The double-pack offers big savings and, if any new hardware does show up under the tree, then Paragon’s time-tested solutions will be a genuine must-have.

xmas16_670x150px_retina

UPDATE: Since the author, in spite of all his efforts, has started to accept that he won’t be getting a pay raise, he ended up deciding against both a Surface a MacBook and opted for a more affordable yet comparably high-performance model from another manufacturer.

UPDATE: The hard disk ended up conking out after all, but thanks to the backup and the right Paragon tools, the author made it through unscathed.

PS: The author also works with a famous Linux distributor, but that’s another story.

Migration without borders: from your old Mac to a new MacBook Pro 2016

One smart Apple

A few weeks ago, Apple has finally presented a much-anticipated update to the new MacBook Pro. The most powerful and thinnest MacBook up to date, it has been redesigned, stuffed with improved hardware and amazing new features.

One of the new features setting the new MacBook Pro apart from the previous models is a brand new Touch Bar, built into the keyboard. It is a multi-touch OLED display panel that offers contextual controls and visual settings that change based on what app you’re using. You can interact with the Touch Bar through taps, swipes, and other multi-touch gestures, with the display supporting input with up to 10 digits at a time.

All existing Apple apps have been updated to take advantage of the Touch Bar, and many third-party developers like Photoshop, Pixelmator, Affinity Designer, DaVinci Resolve, Sketch and others already have plans to build in Touch Bar support and special controls into their apps by the end of the year.

Display in the machine has been significantly improved and goes in 13-inch and 15-inch versions. It’s brighter, offers better contrast, and includes wide color gamut support for richer colors, especially in the green and red spectrum. However, resolution remains the same: 2560 x 1600 on the 13-inch display and 2800 x 1800 on the 15-inch, but the screen still looks amazing.

MacBook pro 15-inch

Apple’s 15-inch MacBook Pro is the most powerful portable notebook computer the company sells, with quad-core processors, with built-in Intel HD Graphics 530 and with discrete graphics cards from AMD, and a larger size setting it apart from the 13-inch machine.

With CPU, GPU, and SSD improvements, Apple says the 15-inch MacBook Pro is 57% faster at video editing , 130% faster rendering 3D graphics, and 60% faster for gaming compared to 2015 MacBook Pro models.

MacBook Pro performance

Base models come with 2.6 or 2.7GHz quad-core Intel Core i7 processors and can be upgraded to a 2.9GHz quad-core Intel Core i7 processor with Turbo Boost up to 3.8GHz.

Two base machines includes Radeon Pro 450 and 455 (each with 2GB VRAM), while the Radeon Pro 460 with 4GB VRAM is available as an update option.

The 15-inch MacBook Pro will switch between the two graphics cards to maximize battery life. The low-power integrated card will be used for non-intensive tasks, while the Radeon Pro will be used for something that requires more GPU power such as 3D rendering or video editing. Built on a 14-nanometer process, the Radeon Pro would be up to 2.5x times more powerful.

Overall, the new 15-inch MacBook is a powerful workstation for media professionals of any kind. With all new features and hardware, the new machine would easily handle any task with graphic design or video editing.

By the way, the component that has received one of the biggest upgrade in the MacBook Pro, is the SSD. 256Gb base storage space and a possible upgrade up to 2TB, and a reading speeds of 3.1GB/s and writing speeds up to 2.2GB/s, makes new MacBook Pro is twice as fast as the SSD in previous MacBook Pro models.

All that calls for the best software to handle large amount of information being transferred and written to an external flash or hard drive. And that’s when our software comes to help. With the new update, ExtFS for Mac 10 now can quickly mount even large, 2TB volumes. And with NTFS for Mac 14 you’ll get full read/write access to any version of NTFS under macOS with the transfer rate is the same as with the native HFS file system!

New Great Migration

Once you decide to buy this Apple’s Lamborghini of laptop computers, you have to transfer all the data from your old MacBook or iMac. Of course, it’s possible to do with inbuilt Mac utilities, like Time Machine or Ethernet cable, but the most reliable way is to make a full copy of your disk, using a specialized third-party utilities, such as Hard Disk Manager for Mac.

All you need is your old Mac and your brand-new Mac, plus a cable to connect them. Once you got all the ingredients ready, follow these steps:

  1. Power up one your new Mac while holding the ‘T’ key down to enter Target Disk Mode. Once the machine starts up in Target Disk Mode, it will appear as a disk icon on the desktop of the other computer.
  2. Connect your Macs via cable. Open Paragon HDM for Mac on your old machine. To launch the “Copy Hard Disk” wizard, right-click on the hard disk (largest rectangle with partitions inside) and select “Copy Disk”.Hard Disk Manager 
  3. Specify the target hard disk using the drop-down menu.
    MacBook Pro solution 
  4. If you wish to copy the entire hard disk, leave all Source Partitions checked. You may also want to uncheck Resize boxes for this scenario. Otherwise, uncheck “Copy” box for partitions you wish to leave behind.
    Paragon HDM for Mac 
  5. Use “Raw” option to copy partition in sector-by-sector mode, making the resulting partition fully identical to the original one. This also helps to avoid problems with processing unrecognized or protected file systems.
    МасBook Migration 
  6. Click “Copy”. You can now preview your changes! Press “Apply Operations”, then – “Apply”. Done!
    MacBook Pro 2017
    That saves a lot of time and only depends on the cable’s transfer speeds you use. No dependence on Wi-Fi connection or Internet speed. Also, make sure to power plug your machines! When you are done, you can use your new Mac as if you were using you old one.

    Paragon Hard Disk Manager for Mac is not just for copying — it’s a powerful application that covers all aspects of the computer’s life cycle, including drive partitioning, file system optimization and repair functions, data backup capabilities, and irreversible data wiping. It also supports the file systems of OS X, Windows, and Linux.

Paragon Hard Disk Manager for Mac

  • System Integrity Protection in OS X 10.11
    El Capitan support;
  • Sector-level backup for best perfomance and backup/recovery speed;
  • Move, resize, undelete partitions and modify their properties;

When one is not enough, get five!

We are proud to release Paragon UFSD (Universal File System Driver) Value Pack – a bundle of five essential cross-platform tools: NTFS for Mac, ExtFS for Mac, HFS+ for Windows, ExtFS for Windows, and NTFS-HFS Converter, powered with Lifetime UPGRADE ASSURANCE for each product in the bundle.

The UFSD Value Pack has been developed for users working with multiple operating systems to instantly solve compatibility issues. The UFSD Value Pack comes with a lifetime free upgrade guarantee, and is available for just $49.95 — a savings of nearly $100 compared to purchasing the included tools separately. For existing Paragon NTFS for Mac 14 customers, the UFSD Value Pack is available for just $19.95 in their personal MyParagon accounts. For all users with NTFS for Mac 12 version and lower the final bundle price is $24.95. Check out your offer now >>

Paragon UFSD Value Pack includes:

NTFS_for_Mac_14

Paragon NTFS for Mac® 14: Full, ultra-fast read/write access to NTFS partitions under macOS.

extFS_for_Mac_10

Paragon ExtFS for Mac® 10: Full read and write access to Ext2/3/4 partitions under macOS with data transfer rate similar to native file system performance. The same driver also checks, repairs, creates, and formats Ext2/3/4 volumes.

HFS_11_for_Windows

Paragon HFS+ for Windows® 11: The only solution with full access to HFS+ partitions on disks of any type (GPT, MBR), with higher transfer rates than native HFS file-system performance.

extFS_for_Windows

Paragon ExtFS for Windows®: Fast and transparent access to Ext2/Ext3/Ext4 partitions under Windows; read and write support for LVM (Logical Volume Management).

ntfs_HFS_3d

Paragon NTFS-HFS Converter: Converts NTFS volumes to HFS+ and vice-versa, with a backup option.

Paragon UFSD Value Pack includes the essential tools for unprecedented high-performance read and write access to NTFS, HFS+, and ExtFS partitions from macOS or Windows-based systems. With Paragon UFSD Value Pack installed, dual-boot users can easily write files to NTFS-formatted USB flash drives, SSDs, or traditional hard drives, and copy data to NAS-based storage from a macOS-based computer.

Lifetime_upgrade
All these products come with lifetime free upgrade guarantee, which means free upgrades for all included tools delivered directly to the user’s personal MyParagon account, plus free online support!

Paragon UFSD Value Pack is available here for $49.95.

Still have questions? Check this detailed support FAQ!

How to install macOS Sierra beta: quick Paragon guide

When it comes to announcing new software, Apple gets into an annual cycle. We saw the reveal of macOS Sierra at the Worldwide Developers Conference in June 2016, with a private beta issued to developers at the same time. A public beta, released on July 7, brought Siri, the picture-in-picture mode and a bunch of new Continuity features, like an Auto Unlock option for unlocking a Mac with an Apple Wtch and a Universal Clipboard for copying and pasting text from one Apple device to another.

One of the most exciting announcements was Apple’s new file system APFS, which is already available to Apple developers in a pre-release macOS Sierra beta version and is scheduled to ship in 2017. It’s optimized for Flash/SSD storage and features strong encryption, copy-on-write metadata, space sharing, cloning of files and directories, snapshots, fast directory sizing, atomic safe-save primitives and improved file system fundamentals.

On August 29th, Apple released the eighth beta of macOS Sierra to developers and the seventh beta version to public testers. Though most of macOS Sierra’s features were revealed at WWDC, there are still a handful of discoveries to look for.

If you have an iPhone or iPad and don’t want to wait for more than a week to try out the new Continuity features, like Universal Clipboard and others, you need to install the iOS 10 beta.

However, the software is still in beta stage meaning there could be bugs and interface issues. Make sure to back up your data before installing the beta. If you end up having a serious problem, you can revert back using your backup.

So, if you decided to install macOS Sierra beta, follow these steps:

1. Get the Installer here https://beta.apple.com/sp/betaprogram/. You’ll have to sign in using your Apple ID. Once you’ve signed in, the macOS Sierra beta will be downloaded to your machine.

2. It’s a good idea to install the beta to a partition rather than over your main operating system. Open Disk Utility, click the “Partition” button, then click on the [+] plus button to create a new partition. You’ll need minimum 20GB for basic testing. Click “Apply” to create the new partition on the drive.
Create new partition

3. Run the Installer from the /Applications/ folder on the Mac.macOS Sierra installer

Go through the installation process, and when you get to the disk selection screen, choose “Show All Disks” and select the one you’ve created, click on “Install” to begin installing macOS Sierra to that partition.You will be asked, once again, to make sure you have backed up your data. If you have already created a back up with Paragon Hard Disk Manager for Mac and good to go, then just click “Continue” to proceed.HDM for Mac back up

4. Restart your Mac after the installation is complete and set up your new Installation.Sign up with Apple IDmacOS Sierra diagnostic and usageiCloud keychain

How to switch between macOS Sierra 10.12 and OS X El Capitan

Now you can easily switch between macOS Sierra and the earlier Mac OS X system:

1. Reboot the Mac from the Apple menu, as usual;
2. Hold down the “Option” key, when you hear the boot chime sound;
2. Select the drive and the operating system you want to boot from, then macOS Sierra or OS X El Capitan.

It’s that easy, you can reboot and switch between the operating systems running on the same Mac in no time!

Backup your Mac – efficiently and reliably!

Snapshot is the best technology to back up your data. The announced Apple File System (APFS) brings this long-anticipated file system mechanism. The arrival of the snapshot functionality in APFS promises big changes to Time Machine, which should completely replace the creaky, aging mechanism of hard links – a slow and resource-consuming process.

Paragon Hard Disk Manager for Mac delivers everything for data management, backup and recovery. It is designed to create instant copies of a disk (or several disks) at a specific point in time. This technology takes consistent snapshots of both inactive and in-use partitions. Unlike Time Machine, it provides snapshot-based backup and operates at the sector level, achieving superior performance and speed.

Paragon Hard Disk Manager for Mac is not just for backup — it’s a powerful application that covers all aspects of the computer’s life cycle, including drive partitioning, file system optimization and repair functions, irreversible data wiping. It also supports all OS X, Windows, and Linux file systems bridging incompatible systems. With Paragon Hard Disk Manager you can even back up data to affordable and popular NTFS-based carriers.

Enjoy the new macOS Sierra and its new features, and do not forget to back up your data and system with Paragon Hard Disk Manager for Mac!

Try Now

Better safe than sorry! Paragon Backup & Recovery 16 is out now!

Pabr16Logoragon Backup & Recovery 16 is an advanced backup and safeguarding software that enables private users to perform complex backup tasks with ease. Thanks to Backup and Recovery 16, there is absolutely no need for deep IT skills or advanced computing knowledge in order to protect files and folders, partitions, disks or even the entire system. Paragon Backup & Recovery makes PC protection child’s play.

Software wizards

Not sure which setting is most suitable? No need to worry! The powerful software wizards of Paragon Backup & Recovery 16 guide users step by step through the backup jungle – and the newly designed UI will clear the path!

Free download for a limited period!
$39,95Free download for a limited period!

Backup Job Wizard

Backup Job Wizard - Backup & Recovery 16
Backup Job Wizard – Backup & Recovery 16

The Backup Job wizard is the ultimate in automated backups. Thanks to intuitive presets, less than 8 clicks are needed to set automated backup jobs for the entire windows system, single files, folders or partitions.
However, advanced users get the full control at their hands and can refine and modify existing strategies or define custom ones.

  • Set-and-forget technology: continuous PC protection without questions
  • All backup technics: including incremental backup, file based backup, differential backup, full backup, backups of particular file types, backup to virtual hard disks…
  • Flexible scheduling: daily, hourly, weekly, monthly and even erratic schedules are possible (e.g. daily, every second week, not on Wednesdays and Fridays)
  • Powerful retention mechanism: automatically deletes older backups. Based on intuitive presets or manual definitions. Backup & Recovery automatically ensures that the most recent backup is always available.
  • Pinned backups: exclude single backups from the retention policy with a single click
  • And many more

Continue reading Better safe than sorry! Paragon Backup & Recovery 16 is out now!

An extremely simple trick to keep your Mac or PC from unauthorized access

We frequently talk about recent security threats, including the new Trojan horse called “Locky” that encrypts your information forever, making it impossible to read.
Unfortunately, Locky is not the only virus that can cause problems for your operating system. There are many other types of viruses which can silently infiltrate a computer without you even noticing it. One of the most common and easiest ways of accessing your system is through an external flash or a hard drive.

There are a number of software solutions to help prevent such infection, as well as a radical and 100 percent secure hardware method. You can protect your USB ports from an unauthorized access for a short period of time simply by disabling the ports.

If you are using Windows…

All that you need is Notepad and an administrator-level account.

First, create a new document, then copy and paste the following text:

Windows Registry Editor Version 5.00
[HKEY_LOCAL_MACHINE\SYSTEM\CurrentControlSet\Services\USBSTOR]
”Start”=dword:00000004
[HKEY_LOCAL_MACHINE\SYSTEM\CurrentControlSet\Services\USBSTOR\Enum]
”Count”=dword:00000000
”NextInstance”=dword:00000000

Save the file in the desired location and name it usboff.reg. Be sure to save it with the .reg extension and not .txt, or this trick will not work.

Now repeat the process, changing only two parts: in the line ”Start”=dword:00000004 change the 4 to a 3 , and then save a new file named usbon.reg.

Done!

Now when you want to disable the USB port, simply open the usboff.reg file and confirm the change. This will block any external drive plugged into your PC from working. As you might have guessed, opening and confirming the usbon.reg file will do just the opposite, once again enabling the USB port.
Assuming you are the only one with administrator-level access to the computer in question, no one will be able to change these files except you.

Now for the Mac

This trick is slightly more complicated than on Windows.
OS X 10.11 El Capitan brought with it an additional level of security for your Mac: System Integrity Protection (SIP), which prevents system-related files from modification. Even if you have an administrator-level account, you won’t be able to make changes to these files.

Apple’s new protection policy may have good intentions, but it clearly doesn’t help with our mission to disable USB.

NB! If you are using a USB keyboard or mouse, please don’t attempt this trick! You won’t be able to use these input devices, requiring an alternate method such as Bluetooth.

You can disable SIP by booting into recovery mode. Restart your Mac and hold Command+R as it boots.

From the menu, select Utilities > Terminal. In the Terminal window, type csrutil disable, press Enter, then restart your Mac.

To reenable SIP, launch Terminal while in Recovery mode, but this time type csrutil enable, then press Enter and restart.

But there’s an easier way – download and install the new Paragon Hard Disk Manager for Mac®, which provides, on top of other useful functions, one-click SIP disable feature.

When your SIP is disabled, do the following: open Finder and select Go -> Go to Folder from the menu. Copy and paste the /System/Library/Extensions path into the field and look for two files located there:

IOUSBMassStorageClass.kext
IOFireWireSerialBusProtocolTransport.KEXT

Move these files to the Desktop or other location, but be sure to keep them somewhere safe — you’ll need them to enable your USB ports again!

These small tricks can help you protect your information from being stolen or damaged. If you are interested in more advanced and useful features to protect your Mac, try our new Paragon Hard Disk Manager for Mac, a powerful disk management utility for OS X, featuring:

Paragon Hard Disk Manager for Mac

  • System Integrity Protection in OS X 10.11 El Capitan support;
  • Core Storage backup and restore;
  • Snapshot-driven backup;

Learn more about Paragon Hard Disk Manager for Mac

Paragon Hard Disk Manager for Mac

New Paragon Backup and Recovery 12 Home: faster engine, safest performance, advanced backup features

Paragon introduces Paragon Backup and & Recovery 12 Home – the essential computer system backup and the strongest recovery software available on the market. The 12th edition is empowered with Paragon’s latest performance engine and enhanced backup functionality delivering the fastest and effective hard disk operations.
The software supports the latest generation of hard disks – AFDs and hard disks with over 2 TB and works under Windows 8 (tested under the “Developers’ Preview” version). The new 12th edition of Backup & Recovery Home now perform file backups as well as differential partition and incremental backups, therefore offering all the existing backup techniques available in one solution.

Click for more product information

Enabling Hardware Independent Data Security Policy

http://easycaptures.com/fs/uploaded/388/thumbs/6018341078_b.jpg

Paragon Software has a new article available on the popular Disaster Recovery Journal that was written by Sergey Solomatin.

Today, IT specialists have a wide range of options available to make the data security policy more composite and comprehensive. There are many tools and instruments presented for any level of demand on the IT market. Some of them are intended to be simple and convenient, others have to fit well into the larger enterprise infrastructures.

In this article, two important aspects of all-encompassing data security and management plan are described in more detail. First, I would like to discuss a hardware independent system recovery (HIR) and migration to virtual environments options. Even if you decide HIR is not your solution and do not attach much importance to it, HIR enables you to significantly increase a number of possible recovery, data migration and copying scenarios. In the light of the progress of modern virtualization technologies, HIR gets another great value – smooth system transfer between physical and virtual platforms.

Data Imaging and Virtualization

Creation of images is still the best way to get the maximum level of security for any computer data. It is the oldest and the most popular method of data backup. Despite the fact the technology principles are rather classical; the sector imaging continues its progress.

Nowadays, sector images are commonly used to protect important data and system as a whole. They make possible to store full software environments and system copies in one or several files. With the introduction of high-capacity storages in SOHO segment, imaging technologies break the limit of large enterprises sector and are now affordable to any PC user.

Sector imaging evolution yielded such methods and instruments as incremental and differential images, CDP, granular recovery, hot processing and much more. Another important technology is hardware independent restore that is one of this article’s topics.

Data imaging and virtualization intersect in many IT segments. Both of them come from the enterprise market and are now available everywhere, on any platform. Both of them operate by large containers with data. Recent developments have introduced a merging of the two technologies there more and more data management solutions support data imaging and data management in both physical and virtual realms.

Read the entire article on www.drj.com