High on Sierra: Apple’s WWDC 2017

This year’s Apple Worldwide Developer Conference (WWDC) brings us, as usual, a new version of macOS. Despite various suggestions for what to christen this forthcoming update, Apple tricked everyone and chose a most unexpected name: macOS High Sierra. The similarity to the current macOS Sierra hints at the minor improvements most users will see. However, there are many bigger changes under the hood.

With High Sierra, Apple claims its Safari web browser is faster than all competitors, and presented various benchmarks as evidence. This bold statement was followed by the introduction of Intelligent Tracking Prevention — a feature that means Safari now has content blocking built-in, automatically halting those annoying auto-play ads with sound in their tracks. Safari will also be more privacy conscious, blocking attempts to access cookies on your Mac that are deemed to be an invasion of privacy.

The Photos app also received a few improvements. With better facial recognition and a persistent sidebar, it’s easier to search for objects and scenes, or filter your library more intelligently. If you don’t have Adobe Photoshop installed or don’t want to spend your time poking around inside complicated editing software, High Sierra brings simple but helpful photo-editing tools to Photos, which sync across all your devices. Live Photos can be edited with special effects, while the Memories section of the app is a more intelligent and thoughtful curator of your memoirs.

Photos app WWDC 2017

Apple has also tweaked Mail.app, bringing full-screen, split-window support and better organization with improved Spotlight search that will serve up the most relevant results first.

The macOS update also encouraged Apple to move to the H.625 video standard, with support for improved 4K playback and efficient decoding of ultra-high-resolution video content. Those improvements are coupled with the launch of a new graphics API for developers: Metal 2, which is more efficient than its predecessor (up to 10x in many cases), with support for VR content.

Finally, the Apple File System makes it’s debut with High Sierra. APFS is a next-generation file system for Apple products based upon the iOS, macOS, tvOS, and watchOS software platforms, which now covers devices from the diminutive Apple Watch all the way up to Mac Pro. It’s optimized for Flash/SSD storage and features strong encryption, copy-on-write metadata, space sharing, cloning for files and directories, snapshots, fast directory sizing, atomic safe-save primitives, and improved file system fundamentals.

Apple claims APFS vastly accelerates the speed of actions like duplicating large files, while boasting improved performance, security, and reliability. All users who upgrade should see noticeable gains in day-to-day use.

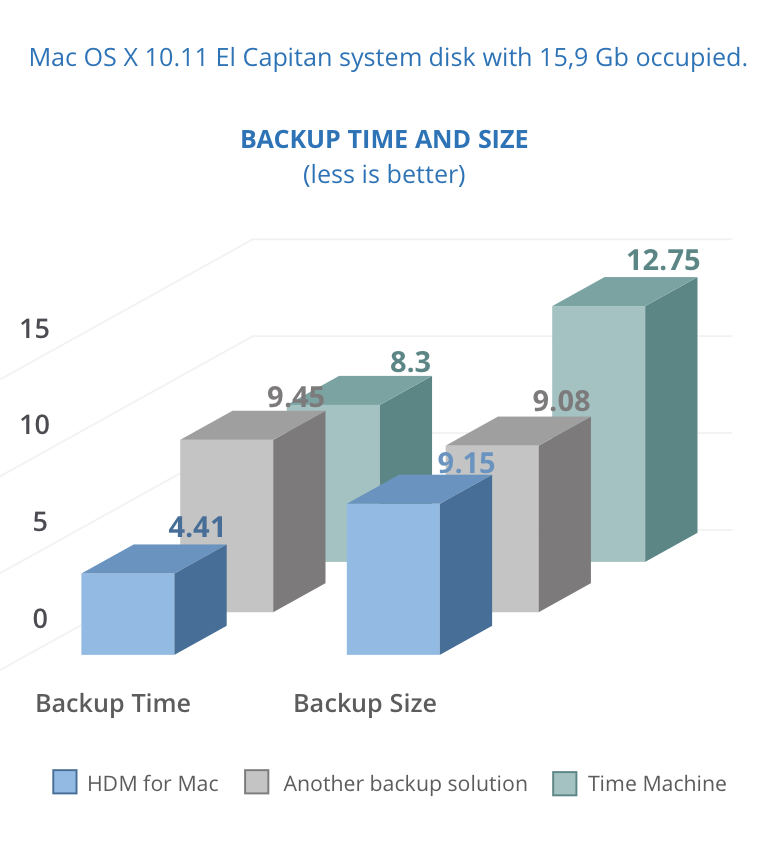
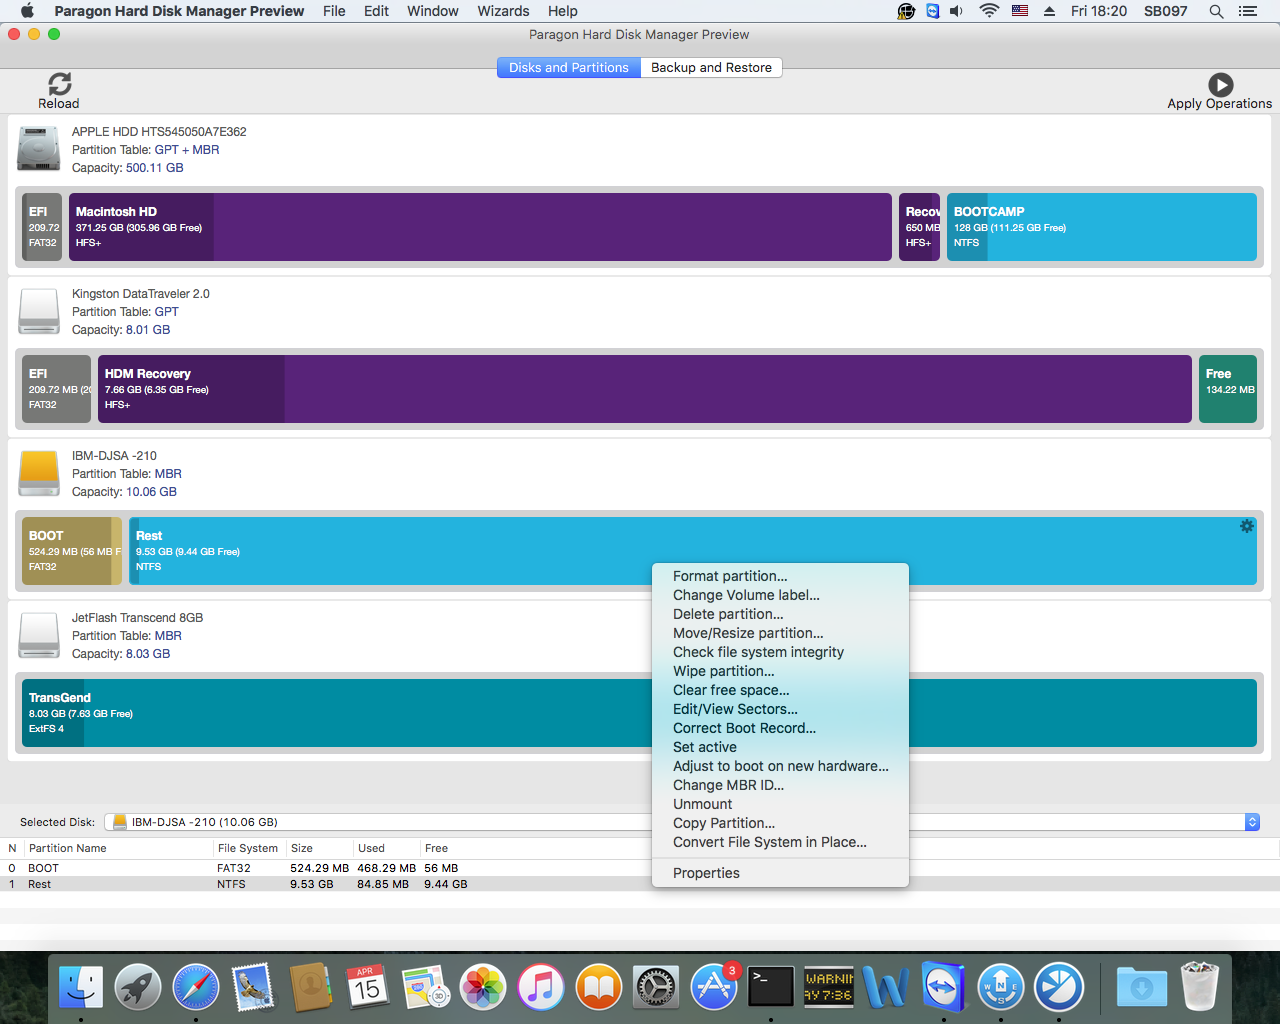
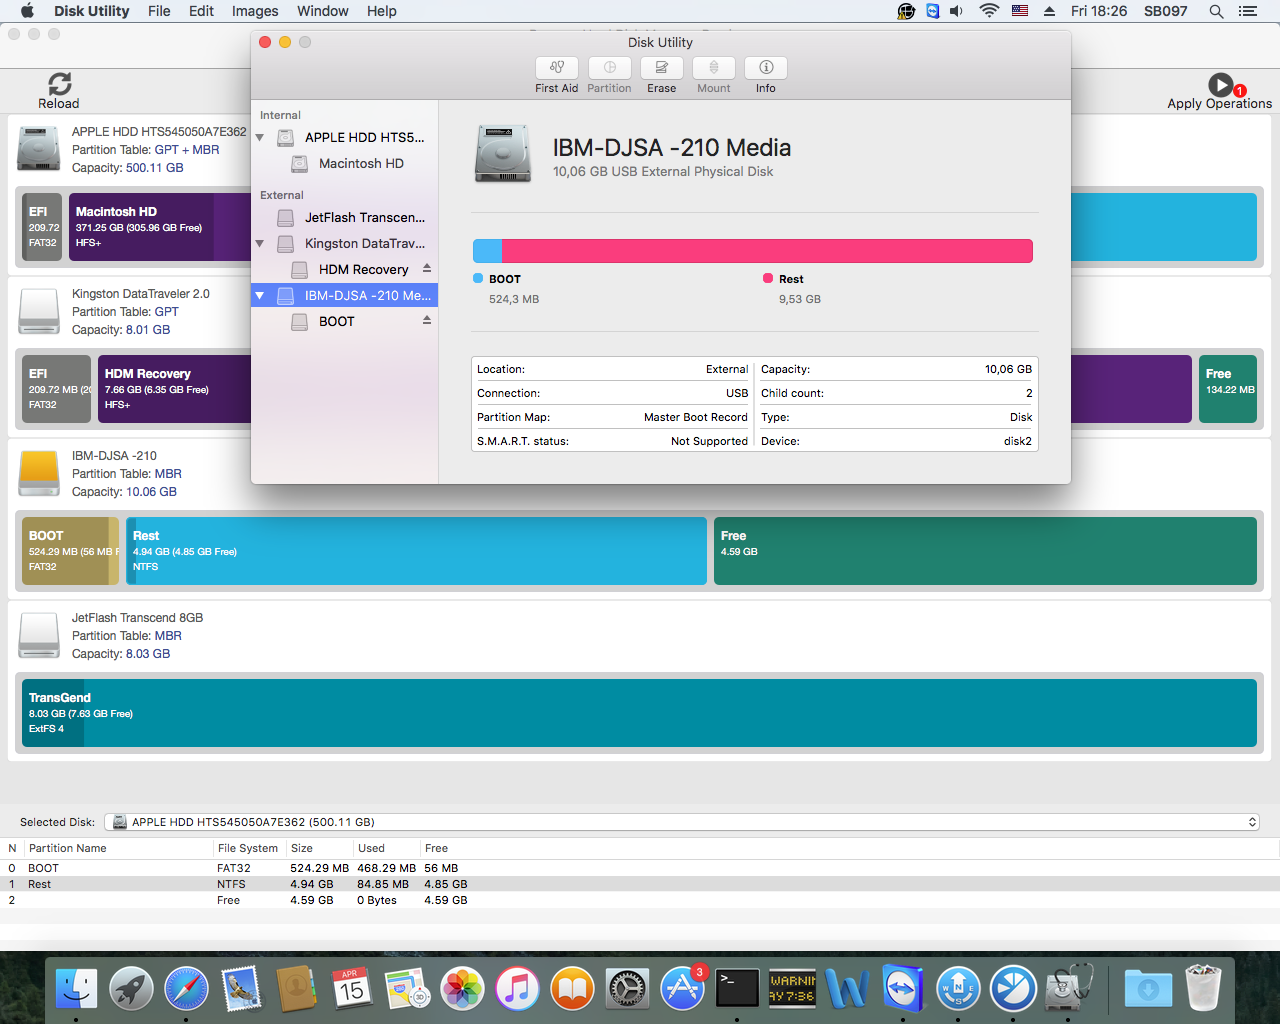
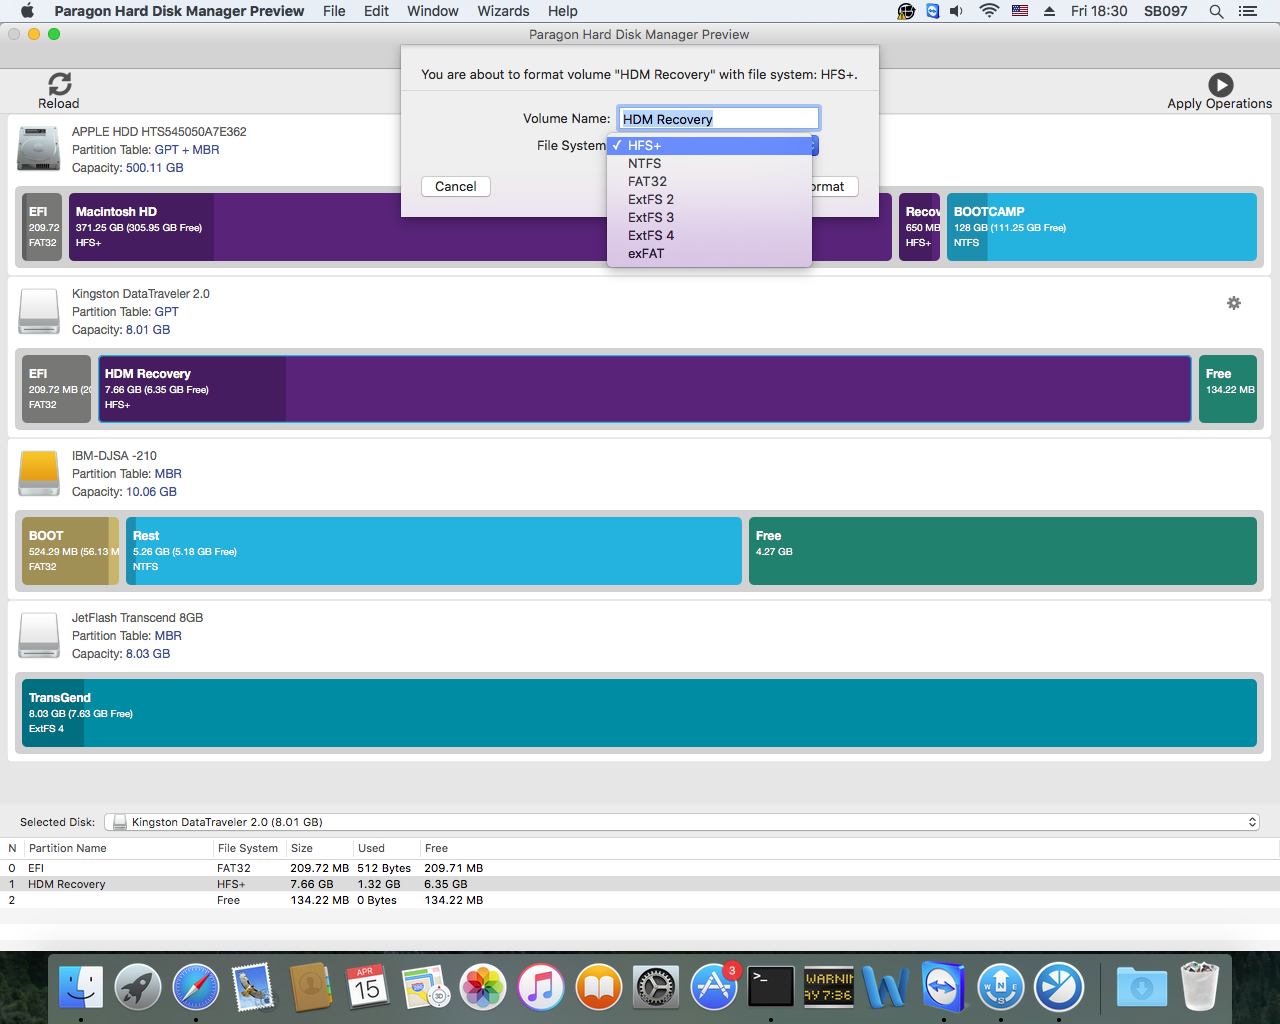
To celebrate this news, we’re offering big savings for our powerful application that covers all aspects of the computer’s life cycle: Paragon Hard Disk Manager for Mac is now available with a 20% off discount! HDM for Mac includes drive partitioning, file system optimization and repair functions, data backup capabilities, irreversible data wiping, and much more.

macOS High Sierra is available as a public beta for early adopters in June from beta.apple.com, and is currently free to download for all Mac developers at developer.apple.com. The new macOS 10.13 will arrive as a full release for all users with compatible Macs and MacBooks this autumn.

Important Tips on Protecting Your System and Data Against WannaCry and Ransomware Attacks

Past few days we all have been following the breaking news on the fast-spreading WannaCry ransomware affecting globally hundreds of thousands PC systems around the world, and are wondering what is this virus and whether your computer system and data might be at risk. WannaCry, like any ransomware is a computer virus that usually spreads via spam emails and malicious download links. The virus is designed to lock up computer files and the ultimate goal is to blackmail the affected user until the victim pays the ransom demand, usually $300-$500 in Bitcoins.

Wana_Decrypt0r_screenshot
Screenshot of the ransom note left on an infected system

WannaCry is especially malicious because it spreads itself and doesn’t even require the user to click any link or open a file. Now most of us wonder how to make your system and data secure.

Planning your data protection and recovery strategy is essential to any PC user. This awareness guide will help you be cautious and save your valuable data on PC from WannaCry or any other potential ransomware threat. In addition to installing anti-virus software like Kaspersky or similar solutions, every PC user should implement stringent backup controls with snapshots to increase safety from attacks and prevent possible data loss. Since this widely spread global cyber-attack is just one of many to hit users, reliable system and data backup is always the key to protect against such malware threats.

Countries_affected_in_WannaCry_ransomware_attack
Map of the countries initially affected by the virus

The following advisory on WannaCry ransomware will help prevent data loss and in case of a disaster recover it fast:

1. Backup your computer with the reliable backup solution.
2. Update your Windows OS with Microsoft’s latest fix.
3. B careful of opening any unknown emails, websites and apps.
4. Use anti-virus protection software in conjunction with a firewall.

To help users protect their systems and valuable data, this week Paragon Software Group started offering all new and existing customers of Paragon Hard Disk Manager 15 Suite and Paragon Hard Disk Manager 15 Professional – the all-inclusive data management tools with full Windows 10 Creators Update support, Br16-protect-restoreParagon Backup & Recovery 16 software absolutely free of charge. This essential tool can be used alongside Paragon Hard Disk Manager for stronger backup functionality, or separately on other devices.

Stay safe and always backup your system.

Basic Ransomware Prevention: How Data Backups Can Save Your System From Hackers

Over the past few years, millions of PCs from around the world have been locked or had their files encrypted as a result of devious malware.
According to Kaspersky Security Bulletin, in 2015 there were 1,966,324 registered notifications for attempted malware infections aiming to steal money via online access to bank accounts. Various ransomware programs were detected on 753,684 computers of unique users; more than 179,000 computers were targeted by encryption ransomware.

In April 2016, CNN Money reported new estimates from the FBI that revealed the costs from so-called ransomware have reached an all-time high. Cyber-criminals collected $209 million in the first three months of 2016 by extorting businesses and institutions to unlock computer servers.

Of course, those big numbers don’t usually affect us, regular users, but we still have our fair share of parasitic programs to be worried about.

One of the newest malwares looks like a pop-up message in Safari that signs: “Your Apple Computer has been blocked. Mac iOS alert! System might be infected due to unexpected error! Suspicious Activity Detected. Your Browser might be hijacked or hacked.” It gives you an 800 number to call and the person on the other end of the line offers you to share your screen and tries to sell you $200-cost security software.

Paragon Hard Disk Manager for Mac

That kind of ‘warning’ message is a common form of malware itself. The problem is that the pop-up appears every time you try to reopen Safari, and it’s impossible to dismiss the pop-up and then access Safari settings before the pop-up reappears. So how do you access Safari and make sure this doesn’t happen again?

Oddly, there’s no way to reset Safari’s settings from outside of the app. First, try the most standard ways to work around a malicious webpage in your browser.

– Launch Safari with the “shift” key held down. This should prevent Safari from opening the pages from the last session.

– Load Safari, then Control-click on its icon in the Dock and choose Force Quit. Try this a couple of times and Safari may get the message that there’s something wrong on startup and start without loading anything.

– Update to El Capitan or Sierra if you haven’t already. Apple added a lot more malware protection in the new OSes, including fixes that stop many browser-based hijack methods.

– Disconnect the computer from the Internet. If there’s no malware hosted locally, the pop-up can only be generated by loading a remote webpage that’s set as the home page. Open your Safari preferences and check, if your home page had been set to an unknown domain. Delete that URL from your Safari settings and turn the Wi-Fi connection back on.

However, the most efficient way to protect yourself is to back up your system to the state before malware hit your machine.

For example, the most recent hacker attack on the San Francisco transit system, in which hackers tried to extort about $73,000 from the transit service in exchange for giving back control of their computer system, ended up relatively well. That’s because Muni, which runs San Francisco’s bus, light rail and trolley car systems, had a backup of its system and, as a consequence, no customer data was stolen.

One of the most popular backup tools is Time Machine – the built-in utility for Mac, introduced with OS X Leopard. Time Machine works at the file level, which is inefficient when dealing with an active operating system and running applications. Files should be unlocked or closed for proper backup, which is not an option with most system files and those used by currently running apps.

Time Machine waits until user applications are closed and locked files become available to process, ignoring system files completely. That’s why OS X has a two-step restore procedure: The user first reinstalls the operating system before retrieving application and user files from the backup image.

There’s a better backup approach based on system snapshots, which considerably reduces backup and recovery times. Snapshot is like taking a photo of your file system, excluding changes made after that point. They will still be present on your hard drives and will be included with the future backups, but not the current one. That’s exactly why this is the only backup method that can be used to protect an active operating system. Additionally, although Time Machine waits until running applications are closed and locked files become available, the backup operation obviously takes more time than if it’s done with a snapshot-based utility.

To illustrate the difference, we performed an internal lab test, comparing the brand new Paragon Hard Disk Manager for Mac against Time Machine and another popular file-level backup solution (test results and graphics are available upon request).

Paragon_Hard_Disk_Manager

Paragon HDM for Mac is designed to create instant copies of a disk (or several disks) at a specific point in time. This technology takes consistent snapshots of both inactive and in-use partitions. Unlike Time Machine, HDM provides snapshot-based backup and operates at the sector level, achieving superior performance and speed.

As you can see from the graph above, it takes Hard Disk Manager far less time to back up 9.15 Gb of information than Time Machine or a similar solution. HDM for Mac comes with improved snapshot technology, enabling consistent image backups even as the data is being modified at that moment.

So, if you want your Mac to be malware-proof – always back it up! By backing up your system, you save valuable information and a lot of time should you need to restore.

Paragon Hard Disk Manager for Mac

  • System Integrity Protection in OS X 10.11
    El Capitan support;
  • Sector-level backup for best perfomance and backup/recovery speed;
  • Move, resize, undelete partitions and modify their properties;
    • Migrate Windows OS from one Mac computer to another;
      • Format volumes in any of the common file systems (NTFS, HFS+, ExtFS, FAT 16/FAT 32 and exFAT);
      • And much more!

Learn more about Paragon Hard Disk Manager for Mac

Santa’s Conundrum: Surface Book or MacBook Pro?

Christmas is just around the corner, and every year, the author of this article asks himself the question: “am I getting a new Mac?”

OK, to be honest, the author never got a Mac or PC as a present, be it for Christmas or any other occasion. Beyond that, he wouldn’t necessarily choose a machine like that at all if he still had three wishes left.

But first of all, since no fairy ever came along with three wishes to give (at least not yet), and secondly, that it’s been a few years since the author last believed in Santa Claus and thirdly, that he doesn’t know anybody else who could make such wishes come true, this question is largely irrelevant.

Be that as it may: The hard disk has been making some really strange sounds for a while and the excessively loud fan noise has been getting on the author’s tender nerves for a long time by now. The laptop already has nearly five years under its belt – maybe it really is the right time to start looking for a new one?

An iPad, perhaps, or maybe even one of these hip new Macbook Pros with a touch bar? Or one of the new Microsoft Surface Books or maybe even a Surface Studio all-in-one PC would be a real eye-catcher.

The agony oxmas16_235x425pxf choice, so the saying goes. In this case, it’s also hard to balance out the pros and the cons. In spite of its somewhat higher price, the author tends a bit towards Microsoft’s classy laptop, not least because of its integrated tablet function.

One way or another, something has to be done about clattering hard disk – and quickly. An extra backup can never hurt, and if you pick the right one, you might even be able to restore your hard-earned work environment on the new hardware. If the author chooses a new laptop, then he could use his entire system on the new machine without having to change it – including all of the applications. And since the author earns his daily bread at a software company – one that specializes in data migration, backup and restoration – he naturally took precautions, and with the Paragon Hard Disk Manager, he had the right tool at hand.

If the author decides to get a new Surface or Macbook later on, he won’t have any trouble getting started. With the Hard Disk Manager for Windows or Mac, he can optimize for one operating system or the other, move his existing systems to new hardware, back up his Mac OS as well as his Windows PC, and much more. Observant readers may have already noted that the author feels at home on the Mac as well as with Windows – if not, then it’s clear now.

Switching between the two systems has become second nature to him; so much so that he doesn’t always remember which machine he created which file on. But thanks to Paragon NTFS for Mac drivers, this doesn’t matter much anymore. He can access his files from either world with the greatest of ease.

If this gets anybody to thinking: “It’s so easy to juggle between Mac and Windows? I wish I could do that!” then the Paragon Christmas bundle would be the thing to get. The double-pack offers big savings and, if any new hardware does show up under the tree, then Paragon’s time-tested solutions will be a genuine must-have.

xmas16_670x150px_retina

UPDATE: Since the author, in spite of all his efforts, has started to accept that he won’t be getting a pay raise, he ended up deciding against both a Surface a MacBook and opted for a more affordable yet comparably high-performance model from another manufacturer.

UPDATE: The hard disk ended up conking out after all, but thanks to the backup and the right Paragon tools, the author made it through unscathed.

PS: The author also works with a famous Linux distributor, but that’s another story.

“Back up, Forest, back up!” or How to outrun ransomware criminals by choosing the right Mac maintenance & protection solution

Ah, ransomware: Over the past few years, millions of PCs from around the world have been locked or had their files encrypted as a result of devious malware.

What we call “ransomware” today is a form of malware that is typically installed on one’s computer by way of a social engineering attack. The user gets tricked into clicking on a link or opening an attachment — once the malware is on the machine, it begins to encrypt all the data it can find there. Once completed, there will be two files in the directory that indicate which contents are being held hostage, alongside with instructions on how to pay the ransom in order to decrypt those files.

Sounds strange, but ransomware has become a very successful criminal business model. Some infamous examples of the “godfathers” of ransomware are CryptoLocker, Locky, and TeslaCrypt. One such outfit, CryptoWall, has generated over $320 million in revenues to date.

The first ransomware virus, AIDS Trojan (aka PC Cyborg), was created in 1989 by biologist Joseph L. Popp. The AIDS Trojan was first-generation ransomware that used simple symmetric cryptography, and tools were soon available to decrypt those filenames. However, the AIDS Trojan set the scene for what was to come.

According to Kaspersky Security Bulletin, in 2015 there were 1,966,324 registered notifications for attempted malware infections aiming to steal money via online access to bank accounts.  Various ransomware programs were detected on 753,684 computers of unique users; more than 179,000 computers were targeted by encryption ransomware.

In April 2016, CNN Money reported new estimates from the FBI which revealed the costs from so-called ransomware have reached an all-time high. Cyber-criminals collected $209 million in the first three months of 2016 by extorting businesses and institutions to unlock computer servers.

Unfortunately, there’s no end in sight. How can one protect himself and his valuable information from being encrypted into unreadable mess?

If I would think how to improve the usability and protect against crypto malware threats, I would suggest improving incremental backup strategies, which would supervise certain data sources, back them up automatically at any change, and allow them to be restored at any date in the time history. This way, I could easily revert back to before malware encrypted my files.”

The above suggestion was made via email from a Paragon Software customer, and indeed backup is a very efficient way to protect data. According to Oxford Advanced Learners’ Dictionary (developed by Paragon in conjunction with Oxford University Press), “backup is a copy of a file, etc. that can be used if the original is lost or damaged.”

One of the most popular backup tools is Time Machine – the built-in solution for Mac, introduced with OS X Leopard. Time Machine works at the file level, which is inefficient when dealing with an active operating system and running applications. Files should be unlocked or closed for proper backup, which is not an option with most system files and those used by currently running apps.

Time Machine waits until user applications are closed and locked files become available to process, ignoring system files completely. That’s why OS X has a two-step restore procedure: The user first reinstalls the operating system before retrieving application and user files from the backup image.

There’s a better backup approach based on system snapshots, which considerably reduces backup and recovery times. For a better understanding of this method, let’s visualize the entire process.

You want to back up a particular state of your Mac. However, you know that some files are being constantly changed by the system, and some might be changed by you — such as working with them during the backup procedure. It means that part of your system will be backed up at one point of time and the rest some minutes later. This causes inconsistencies with file properties, and you won’t be able to restore references and links between such files.

Snapshot is like taking a photo of your filesystem, excluding changes made after that point. They will still be present on your hard drives and will be included with the future backups, but not the current one. That’s exactly why this is the only backup method that can be used to protect an active operating system. Additionally, although Time Machine waits until running applications are closed and locked files become available, the backup operation obviously takes more time than if it’s done with a snapshot-based utility.

To illustrate the difference, we performed an internal lab test, comparing the brand new Paragon Hard Disk Manager for Mac against Time Machine and another popular file-level backup solution. Have a look at the results:

Paragon Hard Disk Manager, backup, fastest

Paragon HDM for Mac is designed to create instant copies of a disk (or several disks) at a specific point in time. This technology takes consistent snapshots of both inactive and in-use partitions. Unlike Time Machine, HDM provides snapshot-based backup and operates at the sector level, achieving superior performance and speed.

As you can see from the graph above, it takes Hard Disk Manager far less time to back up 9.15 Gb of information than Time Machine or a similar solution. HDM for Mac comes with improved snapshot technology, enabling consistent image backups even as the data is being modified at that moment.

HDM for Mac is not just for backup — it’s a powerful application that covers all aspects of the computer’s life cycle, including drive partitioning, file system optimization and repair functions, data backup capabilities, and irreversible data wiping. It also supports all file systems of OS X, Windows, and Linux.

Get it now! Seriously, it’s that good.

Paragon Hard Disk Manager for Mac

  • System Integrity Protection in OS X 10.11
    El Capitan support;
  • Sector-level backup for best perfomance and backup/recovery speed;
  • Move, resize, undelete partitions and modify their properties;
    • Migrate Windows OS from one Mac computer to another;
      • Format volumes in any of the common file systems (NTFS, HFS+, ExtFS, FAT 16/FAT 32 and exFAT);
      • And much more!

Learn more about Paragon Hard Disk Manager for Mac

Keep your friends close and your hard drives closer: Safely managing disks on your Mac

Keeping personal information truly confidential is something of a challenge in the modern world. Our every move is being recorded, with eyes watching from each corner. It may sound paranoid, but this is the new reality. With our smartphones, social media, and messaging apps, almost everyone is now an open book.

One of the safest ways to keep your information secure is to store it in on your Mac’s solid-state drive (SSD) without access to an internet connection — but that’s nearly impossible these days, right?  For most of us, it’s generally good enough just to be careful when browsing the web and avoid clicking any suspicious links.

But let’s take a look at the worst-case scenario: What if your information is stolen or taken away from you by an employer, roommate, or even the government? What if you decide to sell or donate your Mac? It ultimately doesn’t matter who got access to it — it’s imperative that you destroy personal data before the bad guys grab it.

So how can you make sure your sensitive data doesn’t fall into wrong hands along with your hard disks (HDD) or other media? Physically shredding old disks into tiny pieces is impractical, even if it may ultimately be the safest data method of destruction.

For years, OS X has allowed users to erase data from disks using native tools included with Apple’s Disk Utility. When you select a volume in Disk Utility and click the Erase tab, you can select Security Options and choose how many times the media will be written over. But this procedure is very time-consuming, and you can’t wipe free space on the disk with this method.

Unlike traditional hard drives, it’s no trivial matter to recover data stored on SSDs, due to the way the hardware optimizes storage to reduce wear and tear. But this is by no means foolproof, since there are readily available tools capable of easily reconstructing SSDs that have been erased.

One simple way to protect data is to encrypt it from the very beginning on a new SSD or HDD using FileVault 2. This is a full-disk encryption option that first appeared in OS X Lion 10.7, which keeps your startup volume encrypted at all times. Whenever you boot your Mac and log in to the account via FileVault 2, OS X encrypts everything written to the disk and decrypts everything that being read.

Erasing a FileVault-encrypted volume discards the decryption key, turning your disk into an unreadable mess. Without the key, the erased data is as good as gone. The only problem with this solution is that should you forget your account credentials or lose the recovery key, your data will be permanently lost.

So we are left with the only suitable option: Wiping the drive. When you wipe a HDD or SDD, you erase everything on the disk, including data you previously deleted that might still exist.

When you format a hard drive or delete a partition, you usually delete only the file system, making data invisible but not entirely erased. You need to take an extra step to clean the hard drive completely using specialized data wiping tools. This software works by writing over every divisible part of the drive, used or otherwise.

One of the best tools on the market for a logical-level wiping of your hard drive is Paragon Hard Disk Manager for Mac. It supports all Intel-based Macs, providing tools to quickly and efficiently sanitize hard disks to protect valuable information.

You can irreversibly destroy all data on your disk in compliance with the major national government and military data standards. For only $39.95, you receive a powerful tool to manage data on your hard disks, and keep valuable information completely under your total control.

Paragon Hard Disk Manager for Mac

  • System Integrity Protection in OS X 10.11
    El Capitan support;
  • Core Storage backup and restore;
  • Snapshot-driven backup;

Learn more about Paragon Hard Disk Manager for Mac


Paragon Hard Disk Manager for Mac has been finally released!

We decided to take the next step in our development and present you with our most expected product – Paragon Hard Disk Manager for Mac! Most of you are already familiar with Hard Disk Manager for Windows or even have it installed on your PC. Now, we release Paragon Hard Disk Manager for Mac!

We developed a product that includes all the tools the OS X user needs. Everything from what’s OS X is missing plus comprehensive functionality to easily manage your OS X systems, so once you start using HDM for Mac, you wouldn’t have to run across the web searching for additional programs to successfully manage your Mac. HDM for Mac covers it all!

Enjoy this new powerful Mac solution!

Paragon Hard Disk Manager for Mac

  • System Integrity Protection in OS X 10.11
    El Capitan support;
  • Sector-level backup for best perfomance and backup/recovery speed;
  • Move, resize, undelete partitions and modify their properties;
    • Migrate Windows OS from one Mac computer to another;
      • Format volumes in any of the common file systems (NTFS, HFS+, ExtFS, FAT 16/FAT 32 and exFAT);
      • And much more!

Learn more about Paragon Hard Disk Manager for Mac

We would like to thank our beta-testers and everyone who supported the project – with your help we were able to gather the most valuable feedback and develop a great new product!

Why do you need an extra partition on your Mac and how to create it

Today we’re going to talk about partitions. What is it anyway?

A partition is a specific area of a hard drive, which has a beginning and an ending point, and the space between those points equals the total amount of size the partition defines.

Sometimes people confuse a partition with a volume, but there is a big difference between the two.
A volume is a file system on a partition your Mac or PC can recognize. Common types of volumes include DVDs, hard drives, and partitions or sections of hard drives.

Practically any type of storage you use for your Mac (SSDs, hard drives, USB flash drives, etc.) can be divided into partitions. Each partition can use one of four formats compatible with OS X: HFS/HFS+ (simple and encrypted), ExFAT and FAT.

There are good reasons to split your device into multiple partitions. For example, you want to run multiple versions of OS X on your Mac; organize your data PC-style; manage your backups efficiently or run Windows on your Mac. Especially if you are a big fan of OS X and install all OS X beta-versions, it is strongly recommended by Apple to install all beta versions on a separate partitions, as they can truly ruin your Mac!

To partition a drive, we can use the Disk Utility – a built-in Mac program to manage your hard drives.

NB: Your data will be erased during the procedure, so be sure to back up the information first.

  • Step 1: Open the Disk Utility by searching for it via Spotlight or finding it in Applications > Utilities
  • Step 2: Select the storage device you want to partition from the left pane. The selected drive will appear in the right pane together with its details, such as location, the way it’s connected, and the partition map in use
  • Step 3: Select the drive and then click the Partition button in the Disk Utility’s Toolbar. You will see a drop-down panel displaying a pie chart of how the drive is currently divided
  • Step 4: To add a partition, click the plus (+) button right below the pie chart
  • Step 5: Enter a name for the volume in the Partition field to be displayed on your Mac’s desktop. Press Apply

You can also adjust the volume size by either entering its value in the text box, or by shifting a pie slice anchor in the required direction.

However, some errors might occur in the process, causing you to end up with an unallocated space on your disk unseen in the Disk Utility. An unallocated space is like a void on your hard drive you can’t detect and use with Mac’s inbuilt apps. The only way to manage such space is to use the Terminal, but it is rather complicated and may lead to corruption of files and partitions.

For such cases we have a card up our sleeve: The new Paragon Hard Disk Manager for Mac Preview helps you to easily manage this unallocated space and use it to create partitions, add the unallocated space to the existing partitions, resize free space between Mac OS and Bootcamp partitions and much more.

With HDM for Mac Preview you can resize your partitions in 3 clicks.

Click 1: Select the storage device you want to partition. Choose Move/Resize partition

HDM for mac Preview

Click 2: Shift the anchor to select the size you need. Press OK

Resize partition

Click 3: Press Apply Operations at the top right of the menu

Press Apply

As you can see from the screenshot below, Disk Utility won’t show full information about an unallocated space on your storage device:

Unnalocated space

With HDM for Mac Preview you can additionally format all partitions to HFS+, NTFS, FAT32, ExtFS 2,3,4, exFAT:

FAT32, NTFS, exFAT, HFS+

Find these tips useful? Start using your Mac as a pro right now!

Paragon Hard Disk Manager for Mac

  • System Integrity Protection in OS X 10.11
    El Capitan support;
  • Core Storage backup and restore;
  • Snapshot-driven backup;

Learn more about Paragon Hard Disk Manager for Mac

Paragon Hard Disk Manager for Mac

An extremely simple trick to keep your Mac or PC from unauthorized access

We frequently talk about recent security threats, including the new Trojan horse called “Locky” that encrypts your information forever, making it impossible to read.
Unfortunately, Locky is not the only virus that can cause problems for your operating system. There are many other types of viruses which can silently infiltrate a computer without you even noticing it. One of the most common and easiest ways of accessing your system is through an external flash or a hard drive.

There are a number of software solutions to help prevent such infection, as well as a radical and 100 percent secure hardware method. You can protect your USB ports from an unauthorized access for a short period of time simply by disabling the ports.

If you are using Windows…

All that you need is Notepad and an administrator-level account.

First, create a new document, then copy and paste the following text:

Windows Registry Editor Version 5.00
[HKEY_LOCAL_MACHINE\SYSTEM\CurrentControlSet\Services\USBSTOR]
”Start”=dword:00000004
[HKEY_LOCAL_MACHINE\SYSTEM\CurrentControlSet\Services\USBSTOR\Enum]
”Count”=dword:00000000
”NextInstance”=dword:00000000

Save the file in the desired location and name it usboff.reg. Be sure to save it with the .reg extension and not .txt, or this trick will not work.

Now repeat the process, changing only two parts: in the line ”Start”=dword:00000004 change the 4 to a 3 , and then save a new file named usbon.reg.

Done!

Now when you want to disable the USB port, simply open the usboff.reg file and confirm the change. This will block any external drive plugged into your PC from working. As you might have guessed, opening and confirming the usbon.reg file will do just the opposite, once again enabling the USB port.
Assuming you are the only one with administrator-level access to the computer in question, no one will be able to change these files except you.

Now for the Mac

This trick is slightly more complicated than on Windows.
OS X 10.11 El Capitan brought with it an additional level of security for your Mac: System Integrity Protection (SIP), which prevents system-related files from modification. Even if you have an administrator-level account, you won’t be able to make changes to these files.

Apple’s new protection policy may have good intentions, but it clearly doesn’t help with our mission to disable USB.

NB! If you are using a USB keyboard or mouse, please don’t attempt this trick! You won’t be able to use these input devices, requiring an alternate method such as Bluetooth.

You can disable SIP by booting into recovery mode. Restart your Mac and hold Command+R as it boots.

From the menu, select Utilities > Terminal. In the Terminal window, type csrutil disable, press Enter, then restart your Mac.

To reenable SIP, launch Terminal while in Recovery mode, but this time type csrutil enable, then press Enter and restart.

But there’s an easier way – download and install the new Paragon Hard Disk Manager for Mac®, which provides, on top of other useful functions, one-click SIP disable feature.

When your SIP is disabled, do the following: open Finder and select Go -> Go to Folder from the menu. Copy and paste the /System/Library/Extensions path into the field and look for two files located there:

IOUSBMassStorageClass.kext
IOFireWireSerialBusProtocolTransport.KEXT

Move these files to the Desktop or other location, but be sure to keep them somewhere safe — you’ll need them to enable your USB ports again!

These small tricks can help you protect your information from being stolen or damaged. If you are interested in more advanced and useful features to protect your Mac, try our new Paragon Hard Disk Manager for Mac, a powerful disk management utility for OS X, featuring:

Paragon Hard Disk Manager for Mac

  • System Integrity Protection in OS X 10.11 El Capitan support;
  • Core Storage backup and restore;
  • Snapshot-driven backup;

Learn more about Paragon Hard Disk Manager for Mac

Paragon Hard Disk Manager for Mac

Unbeatable Black Friday deal from Paragon Software

Make use of 20YEARS/20MINUTES/$20 deal!

Still celebrating “20 years Paragon” we are happy to announce Black Friday deal with 80% off on the most popular essential, all-in-one data management solution for Windows PC users working in physical or virtual environments, Paragon Hard Disk Manager 15 Professional.
The software tool will be available at only 20$ starting November 28, 2014, at 8:00 p.m. until November 28 th, 2014, until 8:20 p.m. EST, with no coupon code required.

Updated recently with the newest features, Paragon Hard Disk Manager 15 Professional offers everything you need for system and hard disk management. The most advanced data safety and disaster recovery software with powerful partition features, it comes with a full spectrum of virtual and physical migration operations, agentless MS Hyper-V backup, secure data wiping (even on SSDs) and includes a free update for Windows 10 support.

Click to access the promotion! Don’t be late — you will have only 20 minutes to make a purchase!

Good luck to everyone this Friday!