Santa’s Conundrum: Surface Book or MacBook Pro?

Christmas is just around the corner, and every year, the author of this article asks himself the question: “am I getting a new Mac?”

OK, to be honest, the author never got a Mac or PC as a present, be it for Christmas or any other occasion. Beyond that, he wouldn’t necessarily choose a machine like that at all if he still had three wishes left.

But first of all, since no fairy ever came along with three wishes to give (at least not yet), and secondly, that it’s been a few years since the author last believed in Santa Claus and thirdly, that he doesn’t know anybody else who could make such wishes come true, this question is largely irrelevant.

Be that as it may: The hard disk has been making some really strange sounds for a while and the excessively loud fan noise has been getting on the author’s tender nerves for a long time by now. The laptop already has nearly five years under its belt – maybe it really is the right time to start looking for a new one?

An iPad, perhaps, or maybe even one of these hip new Macbook Pros with a touch bar? Or one of the new Microsoft Surface Books or maybe even a Surface Studio all-in-one PC would be a real eye-catcher.

The agony oxmas16_235x425pxf choice, so the saying goes. In this case, it’s also hard to balance out the pros and the cons. In spite of its somewhat higher price, the author tends a bit towards Microsoft’s classy laptop, not least because of its integrated tablet function.

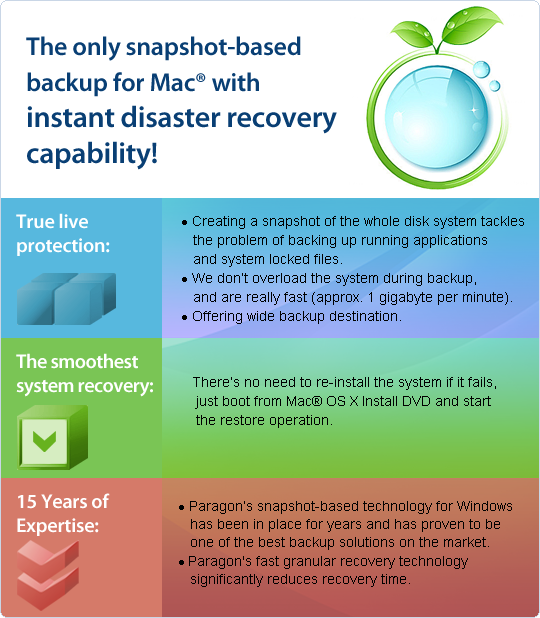
One way or another, something has to be done about clattering hard disk – and quickly. An extra backup can never hurt, and if you pick the right one, you might even be able to restore your hard-earned work environment on the new hardware. If the author chooses a new laptop, then he could use his entire system on the new machine without having to change it – including all of the applications. And since the author earns his daily bread at a software company – one that specializes in data migration, backup and restoration – he naturally took precautions, and with the Paragon Hard Disk Manager, he had the right tool at hand.

If the author decides to get a new Surface or Macbook later on, he won’t have any trouble getting started. With the Hard Disk Manager for Windows or Mac, he can optimize for one operating system or the other, move his existing systems to new hardware, back up his Mac OS as well as his Windows PC, and much more. Observant readers may have already noted that the author feels at home on the Mac as well as with Windows – if not, then it’s clear now.

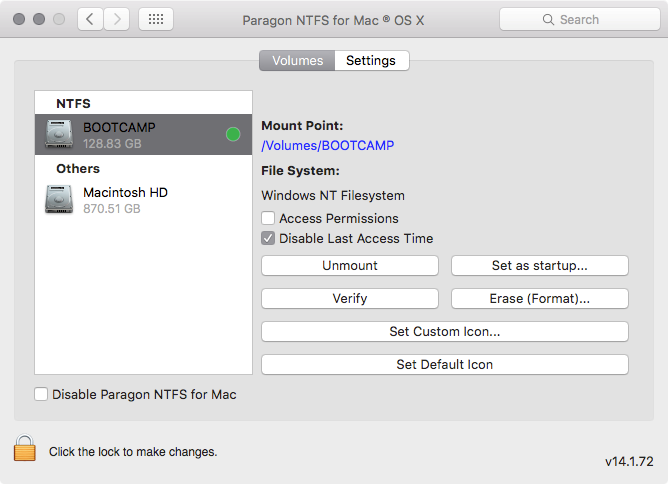
Switching between the two systems has become second nature to him; so much so that he doesn’t always remember which machine he created which file on. But thanks to Paragon NTFS for Mac drivers, this doesn’t matter much anymore. He can access his files from either world with the greatest of ease.

If this gets anybody to thinking: “It’s so easy to juggle between Mac and Windows? I wish I could do that!” then the Paragon Christmas bundle would be the thing to get. The double-pack offers big savings and, if any new hardware does show up under the tree, then Paragon’s time-tested solutions will be a genuine must-have.

xmas16_670x150px_retina

UPDATE: Since the author, in spite of all his efforts, has started to accept that he won’t be getting a pay raise, he ended up deciding against both a Surface a MacBook and opted for a more affordable yet comparably high-performance model from another manufacturer.

UPDATE: The hard disk ended up conking out after all, but thanks to the backup and the right Paragon tools, the author made it through unscathed.

PS: The author also works with a famous Linux distributor, but that’s another story.

How to verify, repair or format NTFS partitions under Mac OS X 10.11 El Capitan. Quick troubleshooting guide

Since the release of Mac OS X 10.11 El Capitan, Paragon Software Сustomer Service have received over a 1000 requests concerning the verify/repair/format disk utility options, which disappeared from the Disk Utility in OS X 10.11 El Capitan. To address this issue, we integrated the functionality directly to NTFS for Mac Preference Pane.

Additionally we have recently released a new professional maintenance tool, Paragon Hard Disk Manager for Mac, to help you perform these basic and numerous advanced file system and volume partitioning operations.

If you are in need of such a solution, you can try Paragon HDM for Mac now.

However, in this article we going to show you how to format, verify and repair NTFS volumes with built-in partitioning tools in NTFS for Mac 14 under Mac OS X 10.11 El Capitan.

Disk Utility vs. Third-Party Drivers

The El Capitan version of Disk Utility has been through major changes — both cosmetically and under the hood. Once you get used to the glossy new user interface, veteran users might notice Disk Utility no longer manages disks mounted by third-party drivers, at least not through the program’s graphical user interface. The reasons for the change don’t make a whole lot of sense to outsiders, especially when disks mounted by non-native drivers can still be mounted, formatted, or repaired by using the command-line diskutil.

In addition to the under the hood changes outlined above, the familiar NTFS for Mac preferences pane has been overhauled with version 14. Since Disk Utility can no longer be used to work with Windows-formatted volumes, NTFS for Mac 14 now includes built-in format, verify, and mount functionality.

In addition to Windows NTFS, other file systems supported by OS X can also be used with this preference pane — for example, if Paragon’s ExtFS for Mac driver is already installed on the same system, NTFS for Mac will also be able to format, verify, or mount Linux-native Ext2/3/4 disks as well.

Here’s what NTFS for Mac 14 looks like when launched:

123

In order to verify or format your NTFS or ExtFS volumes with Paragon drivers, you need to launch the app Preference Pane, select a volume and click “Verify” or “Erase”, depending on what operation you need. 

456

NTFS for Mac 14 also fixes found file system errors during the volume verification process:

789

For those comfortable with Terminal, the same actions can also be performed with Paragon’s command-line utilities. Advanced users familiar with Unix will have access to additional options through this interface:

  • fsck_ufsd_NTFS finds and repairs errors on NTFS disks.

901

  • newfs_ufsd_NTFS formats a volume to NTFS.

902

  • mount_ufsd_NTFS mounts or unmounts NTFS disks.

Support of the Windows NT file system is automatically added to the command-line diskutil during installation of the NTFS for Mac driver.

In case you quite often need not only to verify and format NTFS volumes, but perform more advanced tasks, such as move, resize, copy or even undelete partitions formatted to HFS+, NTFS, ExtFS, FAT and exFAT, try the new Paragon Hard Disk Manager for Mac.

HDM for Mac is not just for backup — it’s a powerful application that covers all aspects of the computer’s life cycle, including drive partitioning, file system optimization and repair functions, data backup capabilities, and irreversible data wiping. It already works with macOS Sierra 10.12 Preview.

Try Now


An extremely simple trick to keep your Mac or PC from unauthorized access

We frequently talk about recent security threats, including the new Trojan horse called “Locky” that encrypts your information forever, making it impossible to read.
Unfortunately, Locky is not the only virus that can cause problems for your operating system. There are many other types of viruses which can silently infiltrate a computer without you even noticing it. One of the most common and easiest ways of accessing your system is through an external flash or a hard drive.

There are a number of software solutions to help prevent such infection, as well as a radical and 100 percent secure hardware method. You can protect your USB ports from an unauthorized access for a short period of time simply by disabling the ports.

If you are using Windows…

All that you need is Notepad and an administrator-level account.

First, create a new document, then copy and paste the following text:

Windows Registry Editor Version 5.00
[HKEY_LOCAL_MACHINE\SYSTEM\CurrentControlSet\Services\USBSTOR]
”Start”=dword:00000004
[HKEY_LOCAL_MACHINE\SYSTEM\CurrentControlSet\Services\USBSTOR\Enum]
”Count”=dword:00000000
”NextInstance”=dword:00000000

Save the file in the desired location and name it usboff.reg. Be sure to save it with the .reg extension and not .txt, or this trick will not work.

Now repeat the process, changing only two parts: in the line ”Start”=dword:00000004 change the 4 to a 3 , and then save a new file named usbon.reg.

Done!

Now when you want to disable the USB port, simply open the usboff.reg file and confirm the change. This will block any external drive plugged into your PC from working. As you might have guessed, opening and confirming the usbon.reg file will do just the opposite, once again enabling the USB port.
Assuming you are the only one with administrator-level access to the computer in question, no one will be able to change these files except you.

Now for the Mac

This trick is slightly more complicated than on Windows.
OS X 10.11 El Capitan brought with it an additional level of security for your Mac: System Integrity Protection (SIP), which prevents system-related files from modification. Even if you have an administrator-level account, you won’t be able to make changes to these files.

Apple’s new protection policy may have good intentions, but it clearly doesn’t help with our mission to disable USB.

NB! If you are using a USB keyboard or mouse, please don’t attempt this trick! You won’t be able to use these input devices, requiring an alternate method such as Bluetooth.

You can disable SIP by booting into recovery mode. Restart your Mac and hold Command+R as it boots.

From the menu, select Utilities > Terminal. In the Terminal window, type csrutil disable, press Enter, then restart your Mac.

To reenable SIP, launch Terminal while in Recovery mode, but this time type csrutil enable, then press Enter and restart.

But there’s an easier way – download and install the new Paragon Hard Disk Manager for Mac®, which provides, on top of other useful functions, one-click SIP disable feature.

When your SIP is disabled, do the following: open Finder and select Go -> Go to Folder from the menu. Copy and paste the /System/Library/Extensions path into the field and look for two files located there:

IOUSBMassStorageClass.kext
IOFireWireSerialBusProtocolTransport.KEXT

Move these files to the Desktop or other location, but be sure to keep them somewhere safe — you’ll need them to enable your USB ports again!

These small tricks can help you protect your information from being stolen or damaged. If you are interested in more advanced and useful features to protect your Mac, try our new Paragon Hard Disk Manager for Mac, a powerful disk management utility for OS X, featuring:

Paragon Hard Disk Manager for Mac

  • System Integrity Protection in OS X 10.11 El Capitan support;
  • Core Storage backup and restore;
  • Snapshot-driven backup;

Learn more about Paragon Hard Disk Manager for Mac

Paragon Hard Disk Manager for Mac

Paragon Camptune X can now add up 2 GBs to your BootCamp partition

The updated version comes with a redesigned user interface, and allows owners of the free edition to also work with Boot Camp.

New and improved features:

  • 2GB can now be reallocated between OS X and Windows absolutely free, particularly convenient for urgent, last-minute changes to available disk space.
  • The new interface design is more intuitive and user-friendly.

Ivan Sidorin, product manager: “We have improved the overall impression of working with the Camptune X application, which has been redesigned to be more convenient from the user’s perspective. We pay close attention to how the user interacts with the software. The new version also improves overall reliability. Finally, we’ve made it more convenient for users of the free edition — for example, if you’re running out of disk space on the Windows partition and urgently need to preserve system updates or other files under 2GB in size. With Paragon Camptune X 10.10, you can now do it in just one click without having to purchase the full version.”

The apps supports OS X 10.6 Snow Leopard to OS X 10.11 El Capitan.

Download yourself and try now!

Get it from CNET Download.com!

A Better Backup for Mac OS

Every Mac has a backup utility called Time Machine, but given the opportunity for a different backup software many Mac fans . Time Machine has its pros and cons. Under the hood of a glossy interface with “bells and whistles” it’s nothing more than a simple file-backup utility, which can’t even work with locked files on demand. There is no simple way of restoring your system after a disaster. You will have to restore the Mac OS then use Time Machine to restore all of your files. Obviously this isn’t an ideal situation and a rather long procedure.

I want to tell you about Paragon Volume Snapshot for Mac, an application, which implements a new level of data security in the Mac World. As it can be seen from its name Snapshot for Mac is a snapshot technology application (as opposed to Time Machine). In fact Paragon Volume Snapshot is the first snapshot backup solution for Mac.

Snapshot Backup for Mac

Basically a snapshot is a image of your entire hard drive including your OS and data. Snapshot for Mac is an online-backup technology, thus it’s able to work with locked files and folders at the time of archive creation. It’s closely related with the Disk Image utility, so in the end you will get images as well-known DMG files. And finally, you can boot your Mac with the Mac OS X installation disc; perform quick restore of your whole application environment from a DMG image in several minutes without any fuss; boot your Mac as usually and continue your work as if nothing had happened.

Let’s see how to use the Paragon Volume Snapshot utility. Just click on the installation package, choose where to install Snapshot for Mac and restart your Mac. The restart is needed for kernel extension installation.

Click the Paragon Volume Snapshot icon in the Applications window, the program’s main window will open.

Here you can see all available volumes on hard drives in the system. Choose one you want to backup and click the “Backup” button.

The program will ask you where you want to store the image, we suggest you to use an external media (HDD or a flash drive) for this purpose. You may be prompted to enter the administrator credentials to continue.

Then you are all set. The backup will begin and you will take your first image of your Mac and have it stored for easy recovery. The Disk Image utility takes approximately 50% of one CPU resources for the DMG packing; the process is rather quick: 1GB of data per minute.

In the end you will get a DMG file with your system and data. You can mount this image as usual and recover some files and folders, or restore your whole environment later.

Paragon Volume Snapshot for Mac is a simple but robust solution, which you can use for disaster-recovery backup of your Mac computers. It provides a new level of data security that cannot be achieved with the use of Time Machine.

If you are interested in doing an online review of our Snapshot for Mac product, leave a comment.

Let us know what you think about Paragon Snapshot for Mac or your favorite Mac backup solution and you could win a copy for yourself.

Volume Snapshot for Mac OS X

The only snapshot based backup solution for comprehensive protection of both data & systems!

Easily create an exact point-in-time copy of your data & system, and when a disaster strikes – get everything back in minutes. Unlike Time Machine and other file-level backup utilities, our solution has very fast backup and restore capabilities. Now you can backup running applications and locked system files, and if your system fails – there is no need re-install, just boot from the Mac® OS X Install DVD and launch the restore operation. This is a huge time saver compared to other methods.

http://easycaptures.com/fs/uploaded/316/thumbs/5707751597_b.jpg

True live protection

Traditional backups involving file archiving has a number of drawbacks, like:

  • Running applications usually require exclusive rights for processed files, thus preventing a backup program from copying them.
  • During a volume backup to ensure accessibility of files and the data integrity, a program requires suspension and/or termination of all running applications. For high-capacity disk systems, this could take hours.

Snapshot-based backup easily solves these problems. It’s a common industry term denoting the ability to record the state of a storage device at any given moment (make a snapshot), and then preserve that snapshot as a guide for restoring the machine in case of emergency.

Fastest Recovery

The old way: In case of a system malfunction (it fails to boot), you should re-install the system first. To do that, you need to boot from a distributive CD and install the system (~40 minutes). After that, you need to set up Time Machine and roll back to the required state of the system. This process is time-consuming as it involves re-installation of the operating system.

The better way: With Paragon Snapshot for Mac you don’t need to re-install the system, just boot from a Mac OS X Installation DVD and restore via Disk Utility. Moreover, data retrieval from snapshot is accomplished through private interfaces, which is faster, than processing files on a file system level. Reduce the number of steps it takes to restore your system with Snapshot for Mac®.

Read more…